Ready-to-Use UI for the iOS Barcode Scanner SDK
Overview
With the Scanbot SDK's Ready-To-Use UI Components (RTU UI), you can integrate scanning functionalities into your app with only a few lines of code. This way, you benefit from tried-and-true UX design and straightforward integration while still being able to customize the visual appearance to match your brand.

The Barcode Scanner RTU UI offers the following scanning modes out of the box:
- Single Scanning: The default scanning mode. It is optimized for detecting a single barcode at a time and is easily configurable to your needs. You can show a confirmation screen after the scan.
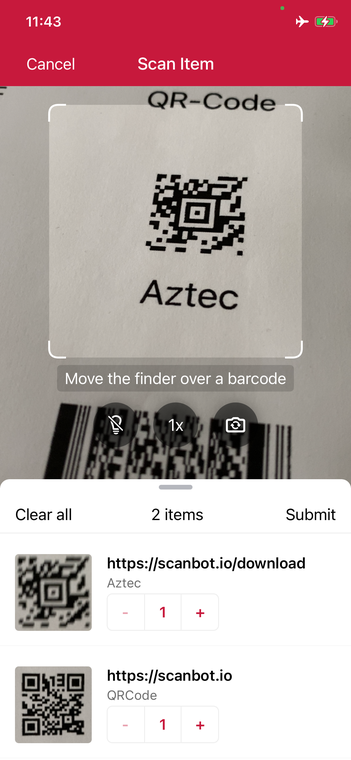
- Batch & Multi Scanning: Scan multiple barcodes in succession without closing the scanning screen, capture more than one barcode from the camera view at once, or count the scanned items.
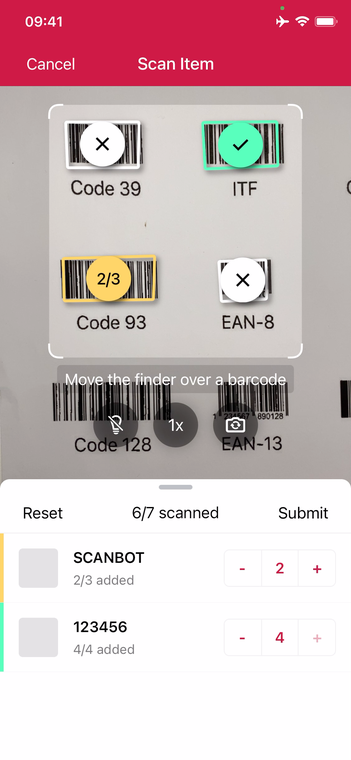
- Find & Pick: Pre-define one or more barcode values and let the SDK visually highlight and scan the correct items. It automatically selects the barcode with the right barcode value from your camera feed.
The RTU UI also comes with numerous configuration options that you can use to quickly adapt its visual appearance:
- Using the palette feature, you can easily define a color palette for your UI components to match your brand design. You don’t have to set each component’s color individually.
- Text elements like the on-screen user guidance can be adapted in wording, position and color.
- You can choose how to display the top bar in your app: transparent or filled.
- A zoom button, a button to switch cameras, and a button to use the device’s built-in flashlight are included out of the box. As part of the UI’s action bar, these buttons are always at your fingertips.
The RTU UI provides components that are simple to integrate and configure, but they are also highly customizable and should suit most of your needs. To achieve an even higher degree of customization, you can implement your own UI and business logic using the SDK's Classic UI Components.
Example code for the RTU UI Barcode Scanner
For a complete implementation of the RTU UI, please refer to our iOS example app.
Complete API references
You can find API references for all RTU UI classes in the iOS Barcode Scanner SDK's API documentation.
Want to scan longer than one minute?
Generate a free trial license to test the Scanbot SDK thoroughly.
Get free trial licenseScanbot SDK is part of the Apryse SDK product family
A mobile scan is just the start. With Apryse SDKs, you can expand mobile workflows into full cross‑platform document processing. Whether you need to edit PDFs, add secure digital signatures, or use a fast, customizable document viewer and editor, Apryse gives you the tools to build powerful features quickly.
Learn more