Quick start for the iOS Barcode Scanner SDK


In this section, you'll learn how to set up the Scanbot Barcode Scanner SDK for iOS in your app, with Barcode Scanning enabled, all within 10 minutes – thanks to our Ready-to-Use UI!
Installing the Scanbot SDK
You can integrate the Scanbot SDK into your app using the Swift Package Manager.
Alternatively, you can also install the Scanbok SDK using CocoaPods or as an embedded framework. Please refer to Installing the SDK for further details.
To get the latest version of the Scanbot SDK, please refer to the SDK's changelog.
Installation via Swift Package Manager
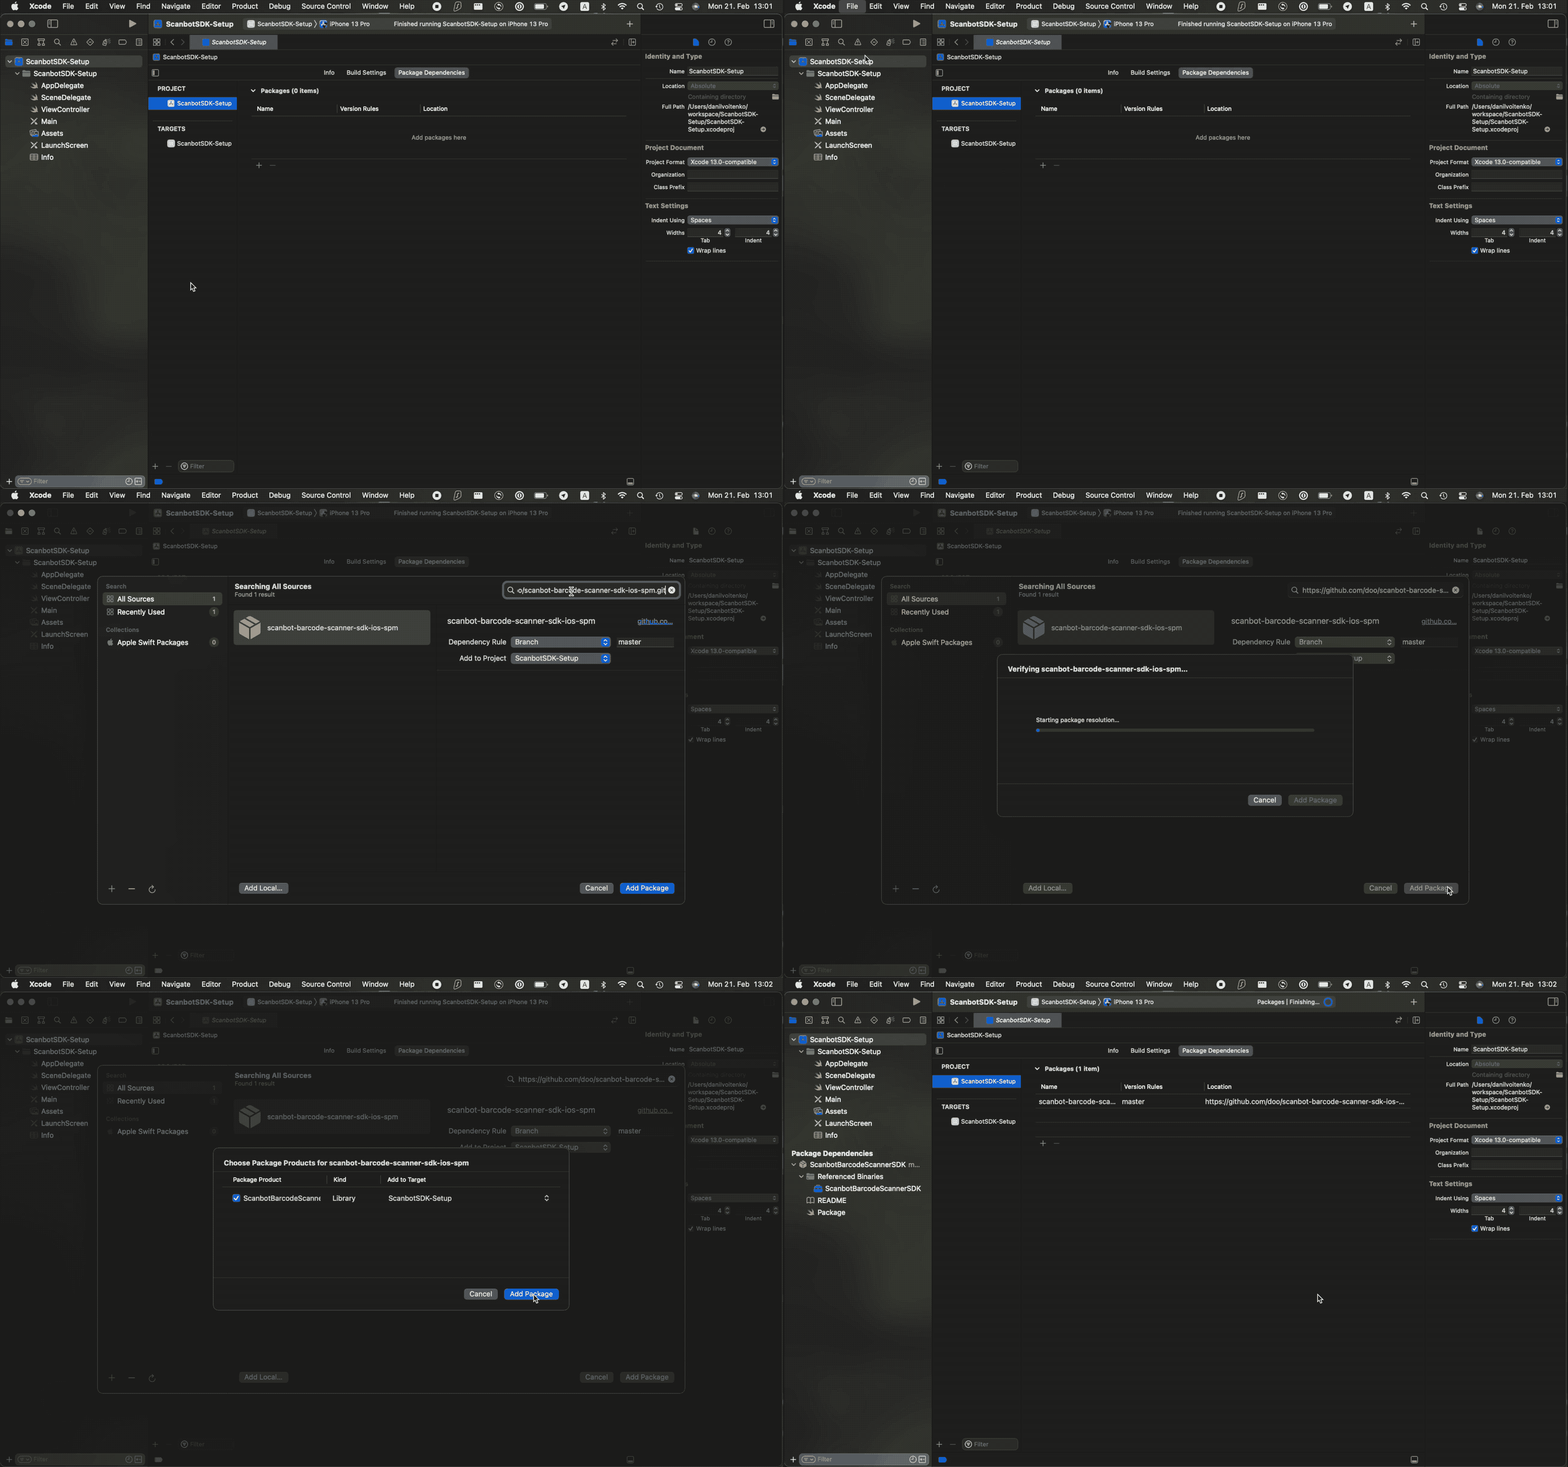
- In Xcode, go to File -> Add Packages...
- Paste a link to package https://github.com/doo/scanbot-barcode-scanner-sdk-ios-spm.git into the search bar.
- Select the package.
- Click Add Package.

Add camera permission
To ensure your app is ready to use the ScanbotBarcodeScannerSDK, it's essential to request camera access by adding the NSCameraUsageDescription key to your Info.plist file.
This step is necessary for the SDK to function properly, as it requires access to the device's camera for scanning barcodes.
Follow these steps to add the camera usage description:
- Open your
Info.plistfile. - Click the + button and start typing
Privacy - Camera Usage Description. - Provide a brief, user-friendly explanation of why your app needs camera access, such as:
Please allow camera usage to scan barcodes.
For more details on requesting authorization to capture and save media, refer to the Apple documentation.
Initialize the SDK
To activate the license in the code, use the Scanbot.setLicense(_:) method of the Scanbot class.
Execute this code as early as possible during your app's runtime, but at least before using any Scanbot SDK functionality, e.g. in your application class (AppDelegate).
If your license has expired, any invocation of the SDK's API will not work.
You can check for license expiration during runtime by using the Scanbot.isLicenseValid property.
Example code for setting the license key string:
func scene(_ scene: UIScene, willConnectTo session: UISceneSession, options connectionOptions: UIScene.ConnectionOptions) {

    Scanbot.setLicense(
      "hiasVhl+q8EgpnDaCEjzDPgp6ex91j" +
      "y6nLK60knb5DGnaMbxnx3pO7jrML5H" +
      "5E6t1XGJ6tFsQm9mm+hSfVnetqEhe4" +
      "VNfXzi/lFYpWT8ICQ1c7YbZbAeyPXc" +
      "D/IcDaRz1vxS85aOL0tbYXynBzvkSx" +
      "mMyFDaL/obrke4h+sonCbLauUA7yXX" +
      "yWlT3gZujS6/a+SzhzpB+7+lCd+Y52" +
      "GBvOsg+h8JfieM/oFzCUZrSazOEusU" +
      "EyOewKLDiOdNqgJpAGK1hF1nQwhcr7" +
      "PysYuECotHSE6NQ2vWJ6RqOz974prq" +
      "EIjEhdprY62qD2pip2MbBHgKYL69DQ" +
      "bFAgyNfSWNtg==\nU2NhbmJvdFNESw" +
      "ppby5zY2FuYm90LmV4YW1wbGUuc2Rr" +
      "LmRlbW8KMTU0NjM4NzE5OQo1MTIKMQ" +
      "==\n")
}
Start the Barcode Scanner and process the result
With just a few lines of code, the Scanbot Barcode Scanner Ready-To-Use UI component SBSDKUI2BarcodeScannerViewController can be integrated into your
application's workflow. It's as simple as starting any regular iOS View Controller.
// Create the default configuration object.
let configuration = SBSDKUI2BarcodeScannerScreenConfiguration()

// Present the scanner view controller modally on this view controller.
SBSDKUI2BarcodeScannerViewController.present(on: self,
                                                configuration: configuration) { controller, cancelled, error, result in

    // Completion handler to process the result.
    // The `cancelled` parameter indicates if the cancel button was tapped.

    controller.presentingViewController?.dismiss(animated: true)
}
🚀 That's it! 🚀 You have successfully integrated a full-featured barcode scanner as an RTU UI View Controller into your app.
💡 Customization: In this Quick Start guide, we use the default configuration for the scanner UI.
Feel free to explore the configs and customize the UI and behavior according to your needs via
the BarcodeScannerConfiguration class.
For more details, please refer to the Ready-to-Use UI page.
Want to scan longer than one minute?
Generate a free trial license to test the Scanbot SDK thoroughly.
Get free trial license