Installation
Requirements
Minimum deployment target: iOS 13.0
Supported architectures:
- XCFramework (Download, Cocoapods, SPM): iPhoneOS arm64, iPhoneSimulatorOS arm64 and x86_64
- Framework (Download): iPhoneOS arm64 and iPhoneSimulatorOS x86_64
Bitcode is no longer supported by Apple and has therefore been removed from the Scanbot SDK
Compatible programming languages: Objective-C and Swift
Variations
The Scanbot SDK comes in 2 different variations, each having different features and size:
ScanbotSDK(fully featured including Document Scanning, Barcode Scanning, Generic Document Scanning, Check Scanning, OCR, PDF Creation etc.)ScanbotDocumentScannerSDK(document scanning only)
Use ScanbotDocumentScannerSDK if you only need document scanning and want to minimize your apps size.
Use ScanbotSDK if you need access to all features.
Distribution
Both variations are available as an XCFramework, as a static framework (deprecated), via Swift Package Manager (SPM) and via Cocoapods.
Use one of the XCFrameworks if possible. XCFrameworks contain all supported architectures and are thinned automatically when uploading your app to appstoreconnect.com. Frameworks are deprecated, due to their inability to run natively on Apple Silicon simulators. When uploading your app to appstoreconnect.com you must strip the framework's x86_64 architecture.
ScanbotSDK and ScanbotDocumentScannerSDK are both published via
- Direct Download as XCFramework: ScanbotSDK.xcframework or ScanbotDocumentScannerSDK.xcframework
- Direct Download as Framework (deprecated): ScanbotSDK.framework or ScanbotDocumentScannerSDK.framework
- Cocoapods (XCFramework): 'ScanbotSDK' or 'ScanbotDocumentScannerSDK'
- Swift Package Manager (XCFramework): ScanbotSDK or ScanbotDocumentSDK
Installation
The installation guides refer to the full ScanbotSDK variation. If you want to use the ScanbotDocumentScannerSDK variation please replace ScanbotSDK with ScanbotDocumentScannerSDK and skip the additional data bundle steps.
- How to install using CocoaPods
- How to install as an XCFramework with Xcode 11 or later
- How to install via the Swift Package Manager
- How to install as a standard embeddable framework (deprecated)
For text recognition, additional data bundles are required in your project. You can include these bundles by adding them to your app's bundle.
Installation using CocoaPods
CocoaPods is a dependency manager for Swift and Objective-C projects for macOS as well as for iOS. It integrates deeply into your Xcode project and manages the third-party components in your application.
- If not already done, install CocoaPods on your Mac
- Add pods to your Xcode project as described in this guide
- Modify your
Podfileto include theScanbotSDKpod as described here
Open your Podfile in Xcode or with any text editor and add the following line:
- ScanbotSDK
- ScanbotDocumentScannerSDK
pod 'ScanbotSDK'
Your Podfile should now read as follows:
target 'SDKPodTest' do
  use_frameworks!
  pod 'ScanbotSDK'
end
pod 'ScanbotDocumentScannerSDK'
Your Podfile should now read as follows:
target 'SDKPodTest' do
  use_frameworks!
  pod 'ScanbotDocumentScannerSDK'
end
Save the Podfile and run the
$ pod install --repo-update
command in your project folder using the macOS Terminal.
Open your application's Xcode workspace (not the project file). You should now be able to use ScanbotSDK in your project.
Additional data bundles (ScanbotSDK only)
For some Scanbot SDK features you will require additional data bundles. These bundles are contained in the pod but, by default, they are not added to your application's bundle.
To use these additional bundles edit your Podfile and add one or more of the following subspecs to the Scanbot SDK pod:
- For optical Text recognition: [OCR]
- For all features: [ALL]
Your Podfile should now look similar to this:
target 'SDKPodTest' do
  use_frameworks!
  pod 'ScanbotSDK', :subspecs => ['OCR']
end
When using all subspecs:
target 'SDKPodTest' do
  use_frameworks!
  pod 'ScanbotSDK', :subspecs => ['ALL']
end
Whenever you change your Podfile you must update the pods using the following command in your project's folder using the macOS Terminal:
$ pod update
Do not use subspecs if not needed, the additional bundles will enlarge your app's file size by a good amount.
CocoaPods version >= 1.5 is required to handle subspec-switching correctly.
Installation as an embeddable XCFramework (XCode 11+ only)
Installing the Scanbot SDK embedded XCFramework is similar to using the framework, except for the strip script which is not needed with XCFrameworks. Check out our step-by-step guide.
- Extract the donwloaded ZIP file and copy the extracted folder into your app's project folder
- Open your app project in Xcode
- Select your app's build target and drag the XCFramework into it
- Optional, ScanbotSDK only: add the data bundle for OCR to your project as needed. See here
- Import the framework's umbrella header in your source code files:
- ScanbotSDK
- ScanbotDocumentScannerSDK
`#import <ScanbotSDK/ScanbotSDK.h>`
or
`@import ScanbotSDK;`
`#import <ScanbotDocumentScannerSDK/ScanbotDocumentScannerSDK.h>`
or
`@import ScanbotDocumentScannerSDK;`
Step-by-step XCFramework installation guide
Step 1
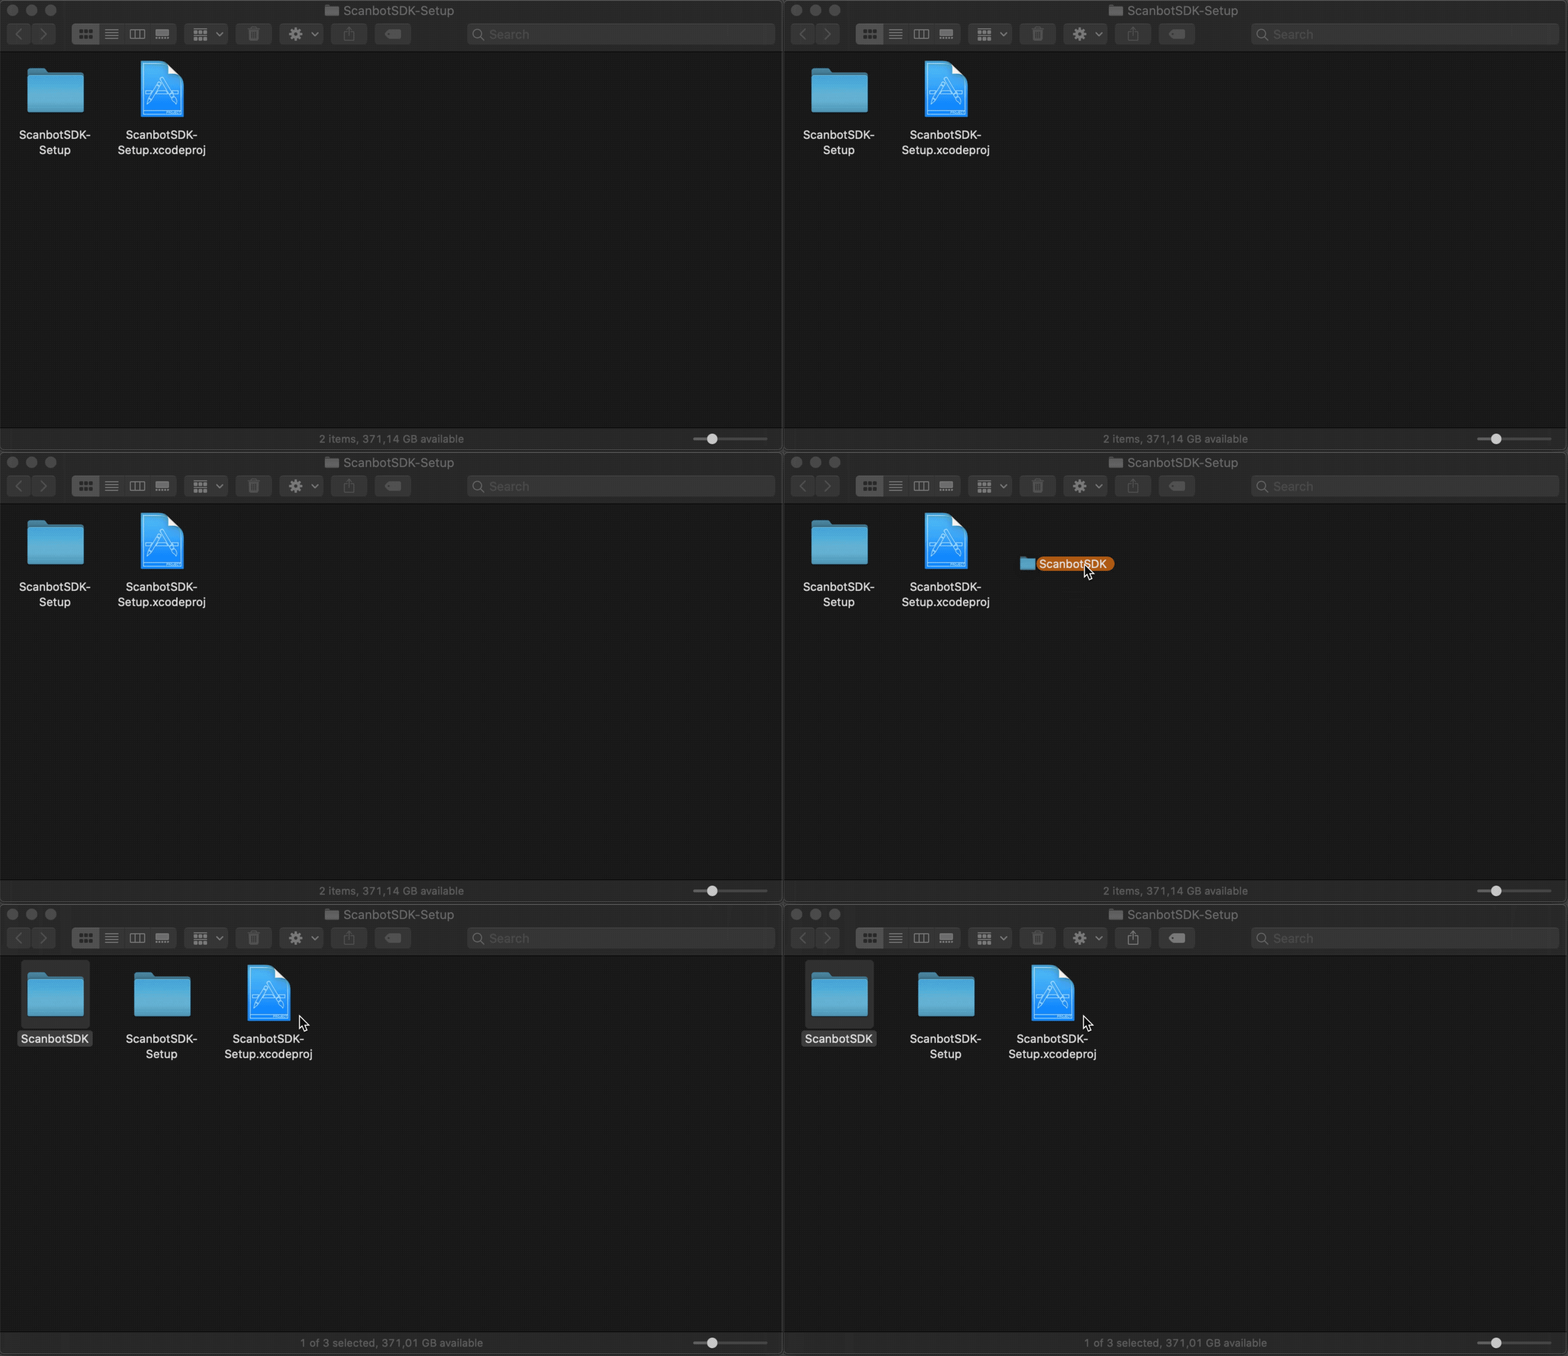 Copy the folder containing the downloaded XCFramework into your app's project folder.
Step 2
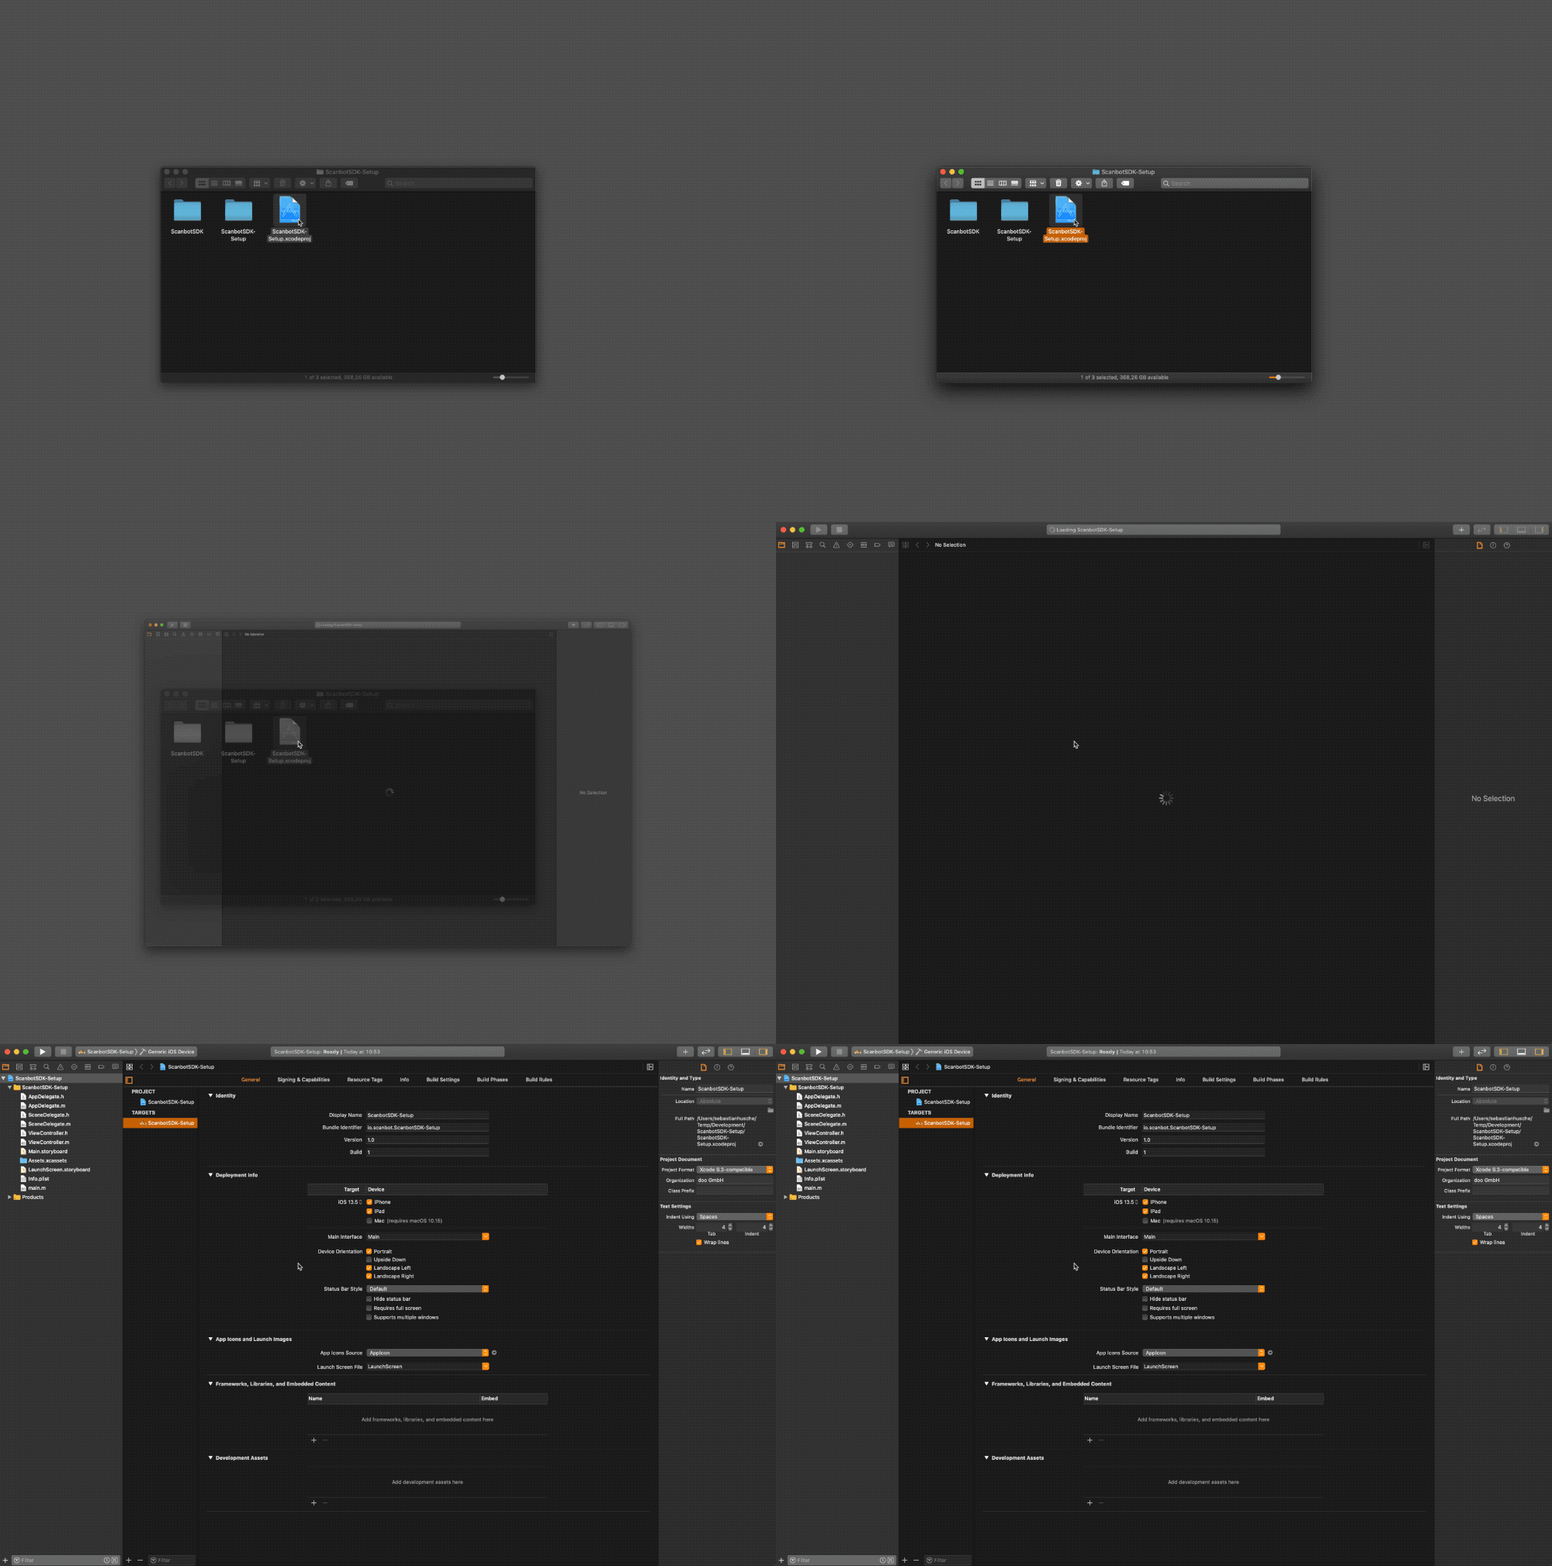 Open your app project in Xcode.
Step 3
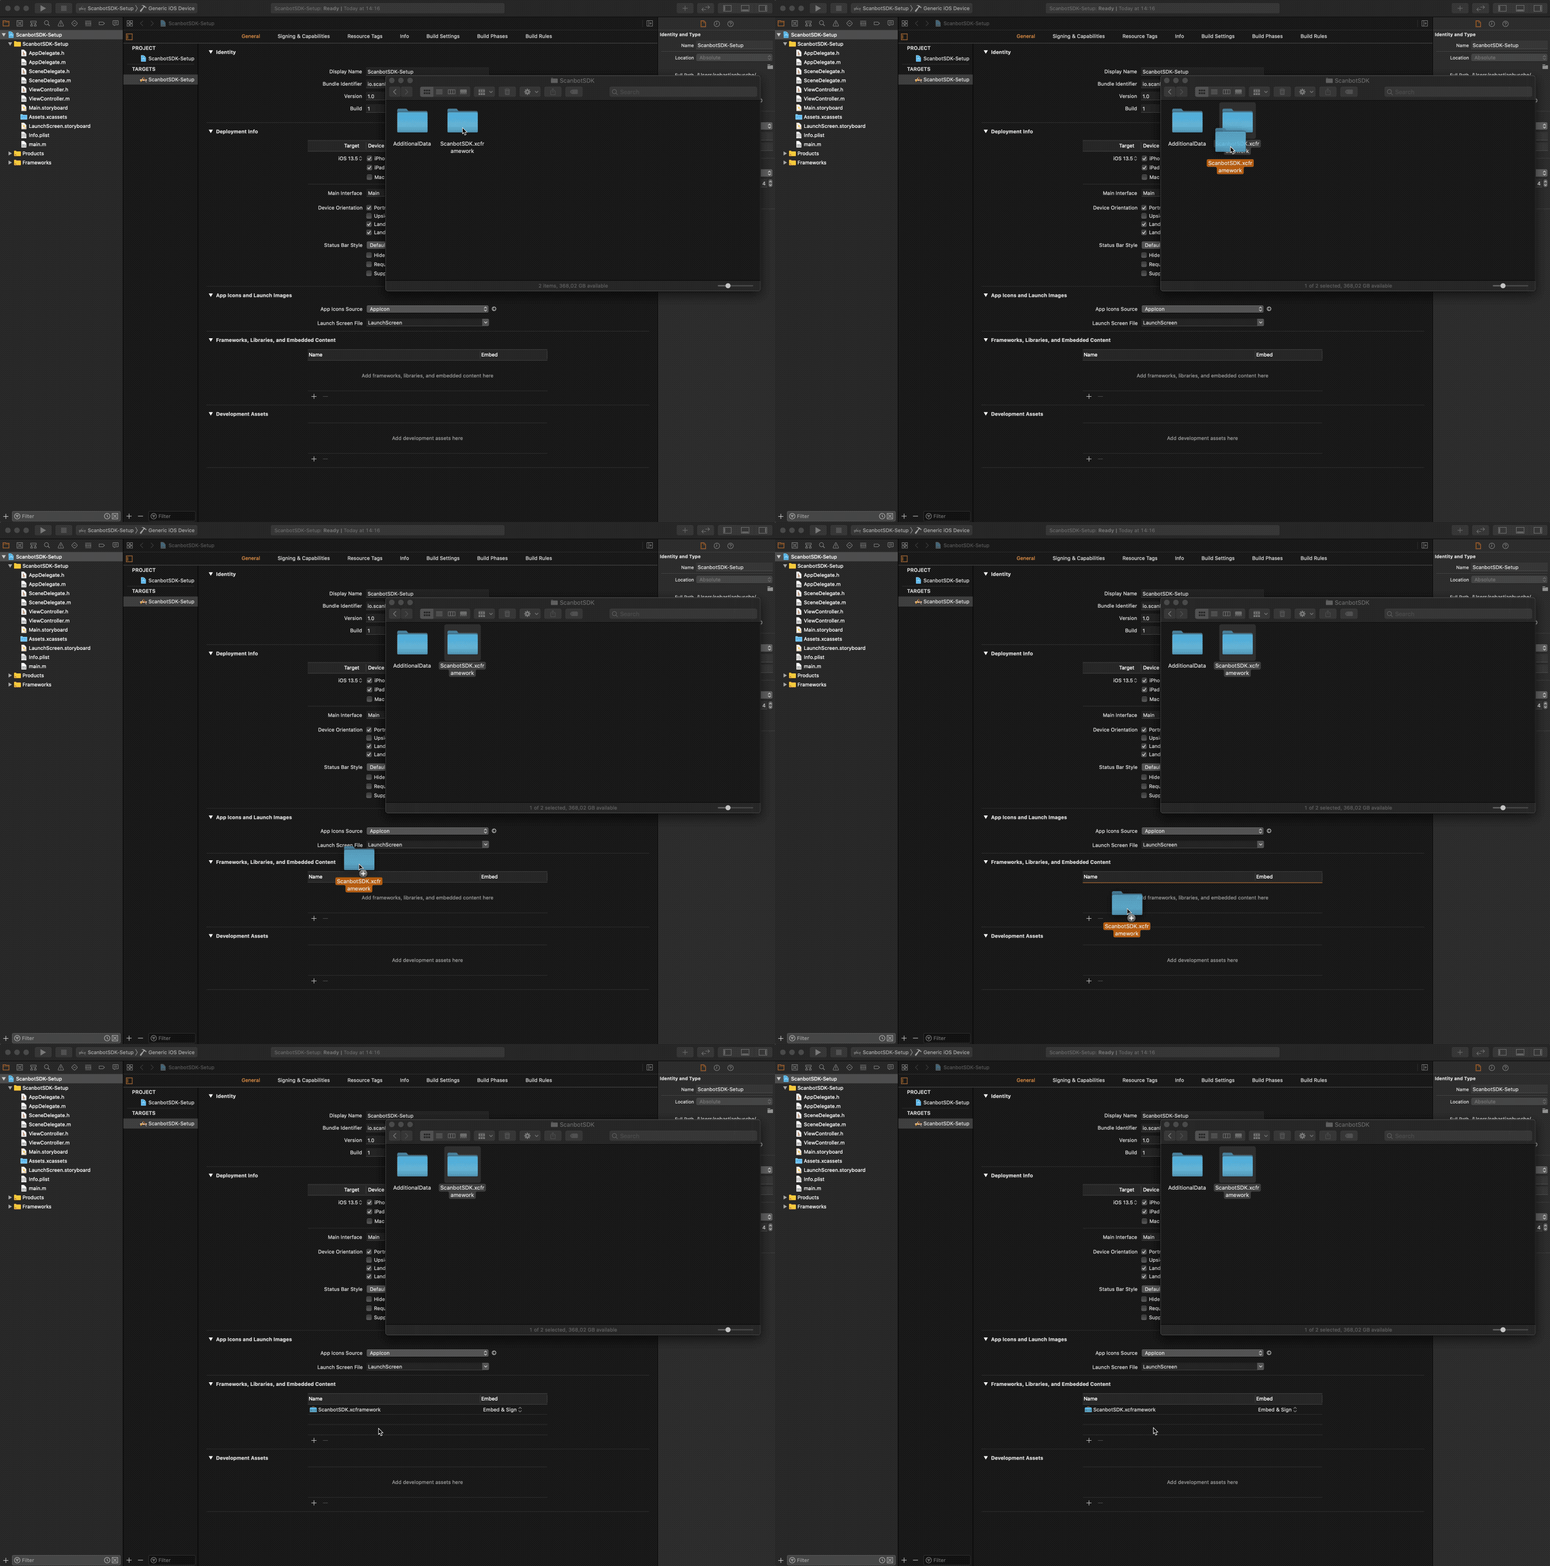 Navigate into the SDK folder and drag the XCFramework into your project's 'Frameworks, Libraries and Embedded Content' section.
Step 4 Install the additional data bundles if required.
Installation as an embeddable framework
Check out our step-by-step guide.
- Extract the downloaded ZIP file and copy the extracted folder into your app's project folder
- Open your app project in Xcode
- Select your app's build target and drag the framework into it
- Add a runscript build phase to strip out simulator architectures from the SDK
- Optional: add the data bundle for OCR to your project as needed
- Import the framework's umbrella header in your source code files:
- ScanbotSDK
- ScanbotDocumentScannerSDK
`#import <ScanbotSDK/ScanbotSDK.h>`
or
`@import ScanbotSDK;`
`#import <ScanbotDocumentScannerSDK/ScanbotDocumentScannerSDK.h>`
or
`@import ScanbotDocumentScannerSDK;`
Step-by-step framework installation guide
Step 1
 Copy the folder containing the downloaded Framework into your app's project folder.
Step 2
 Open your app project in Xcode.
Step 3
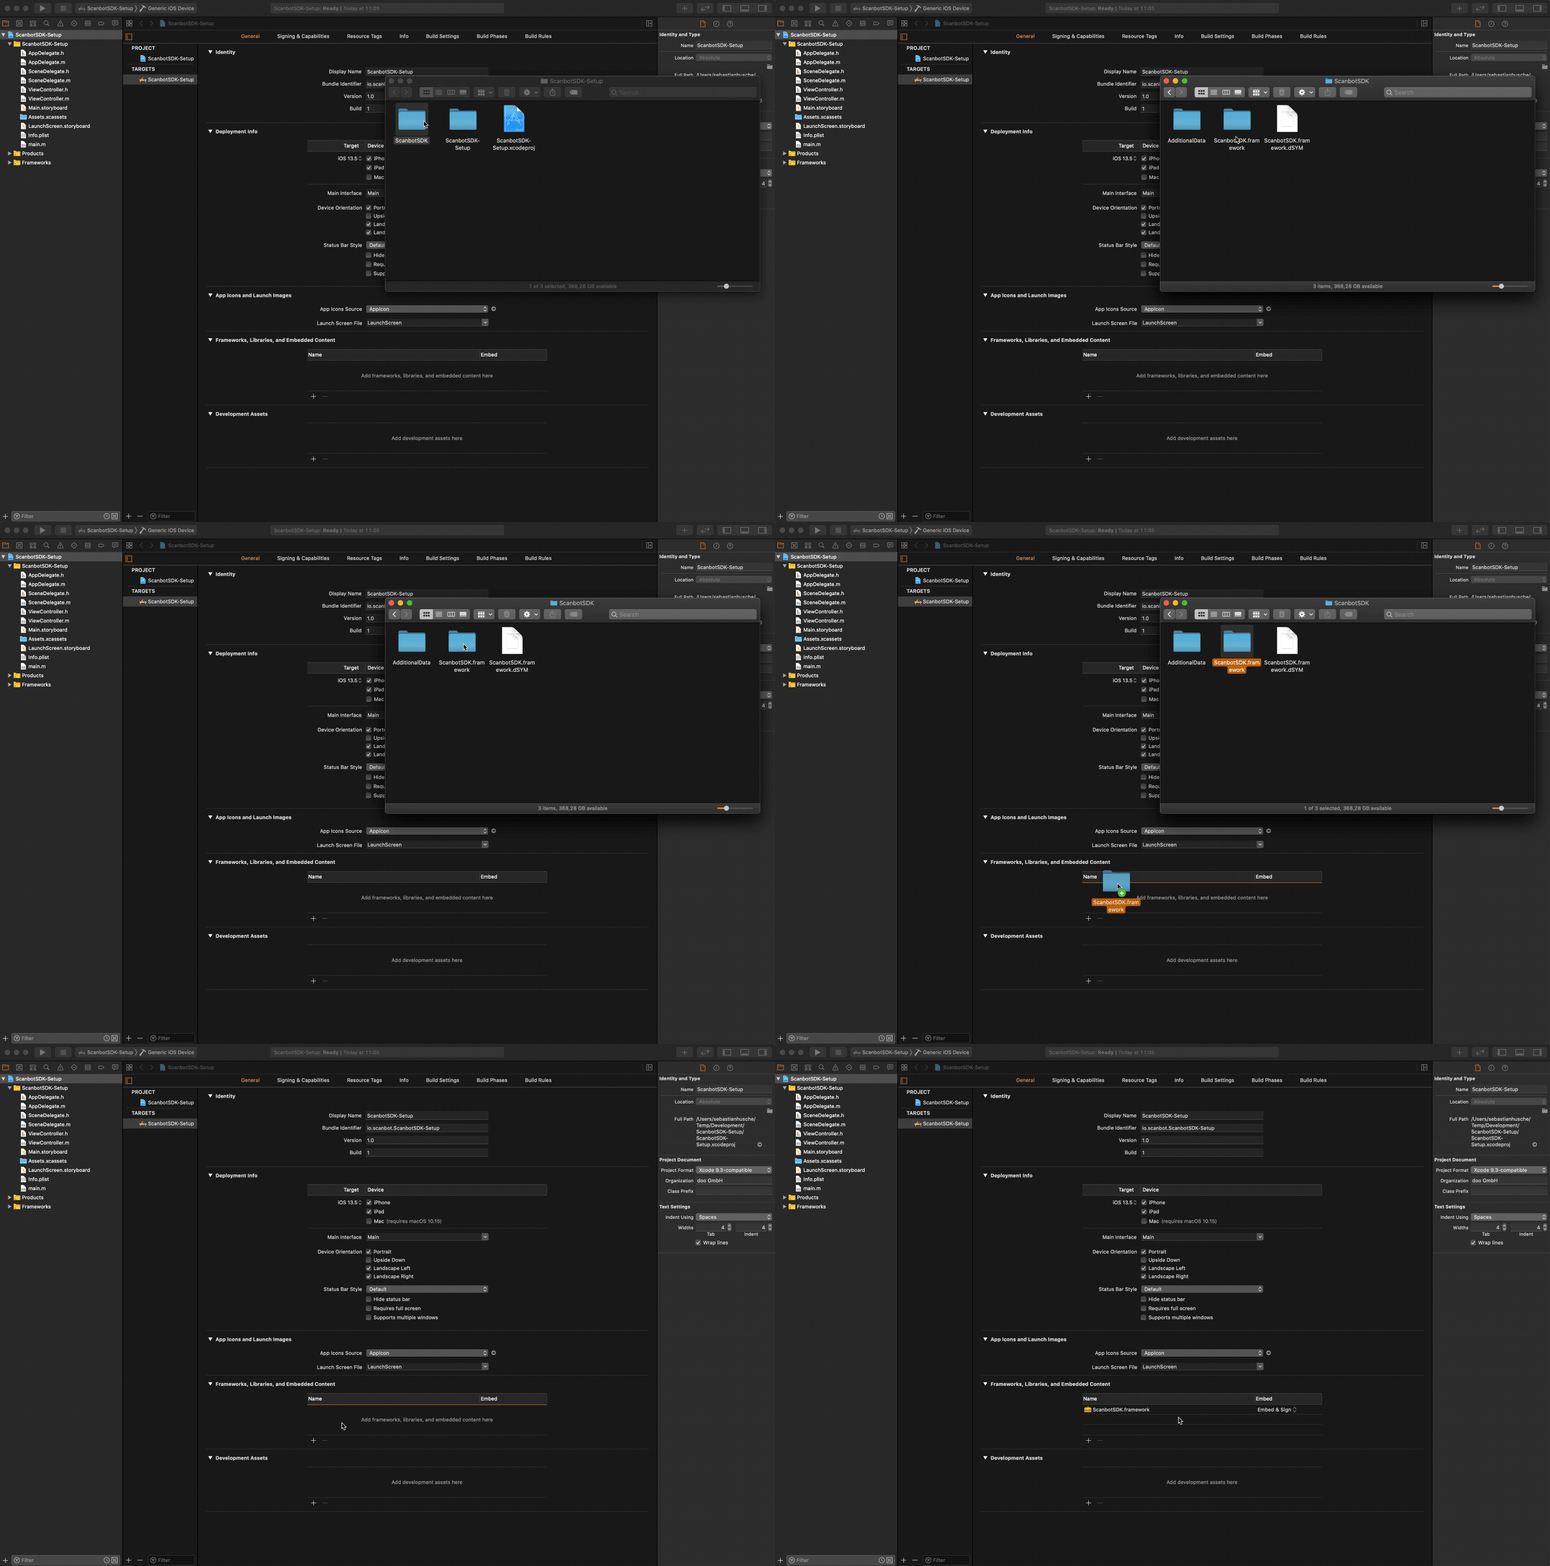 Navigate into the ScanbotSDK folder and drag ScanbotSDK.framework into your project's 'Frameworks, Libraries and Embedded Content' section.
Step 4
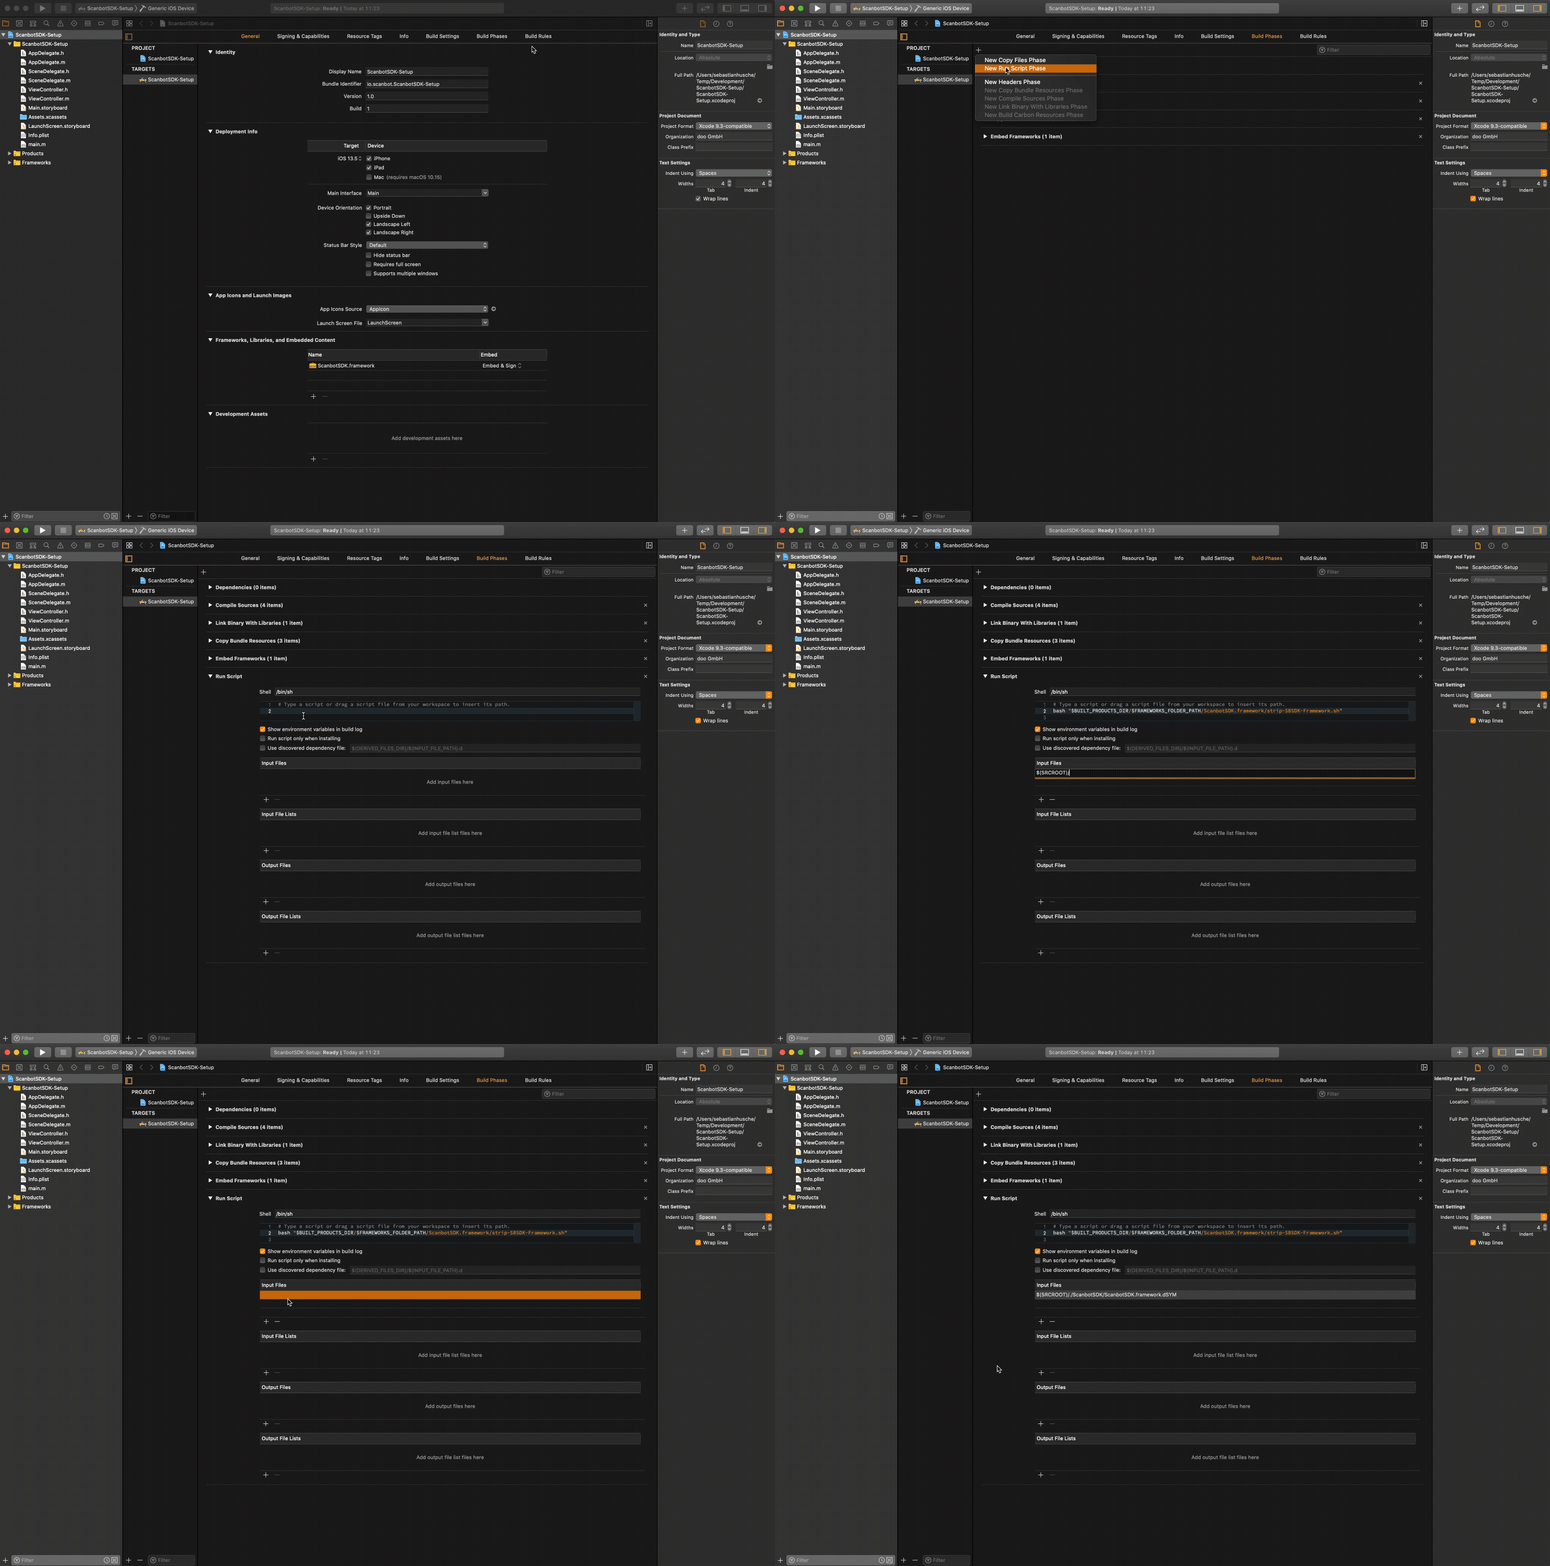 Add a runscript build phase to strip out simulator architectures from the SDK.
Script code:
- ScanbotSDK
- ScanbotDocumentScannerSDK
bash "$BUILT_PRODUCTS_DIR/$FRAMEWORKS_FOLDER_PATH/ScanbotSDK.framework/strip-SBSDK-Framework.sh"
bash "$BUILT_PRODUCTS_DIR/$FRAMEWORKS_FOLDER_PATH/ScanbotDocumentScannerSDK.framework/strip-SBSDK-Framework.sh"
Script input file:
- ScanbotSDK
- ScanbotDocumentScannerSDK
$(SRCROOT)/./ScanbotSDK/dSYMs/ScanbotSDK.framework.dSYM
$(SRCROOT)/./ScanbotDocumentScannerSDK/dSYMs/ScanbotDocumentScannerSDK.framework.dSYM
Step 5 Install the additional data bundles if required.
Install additional data bundles if needed (Framework and XCFramework)
Step 1
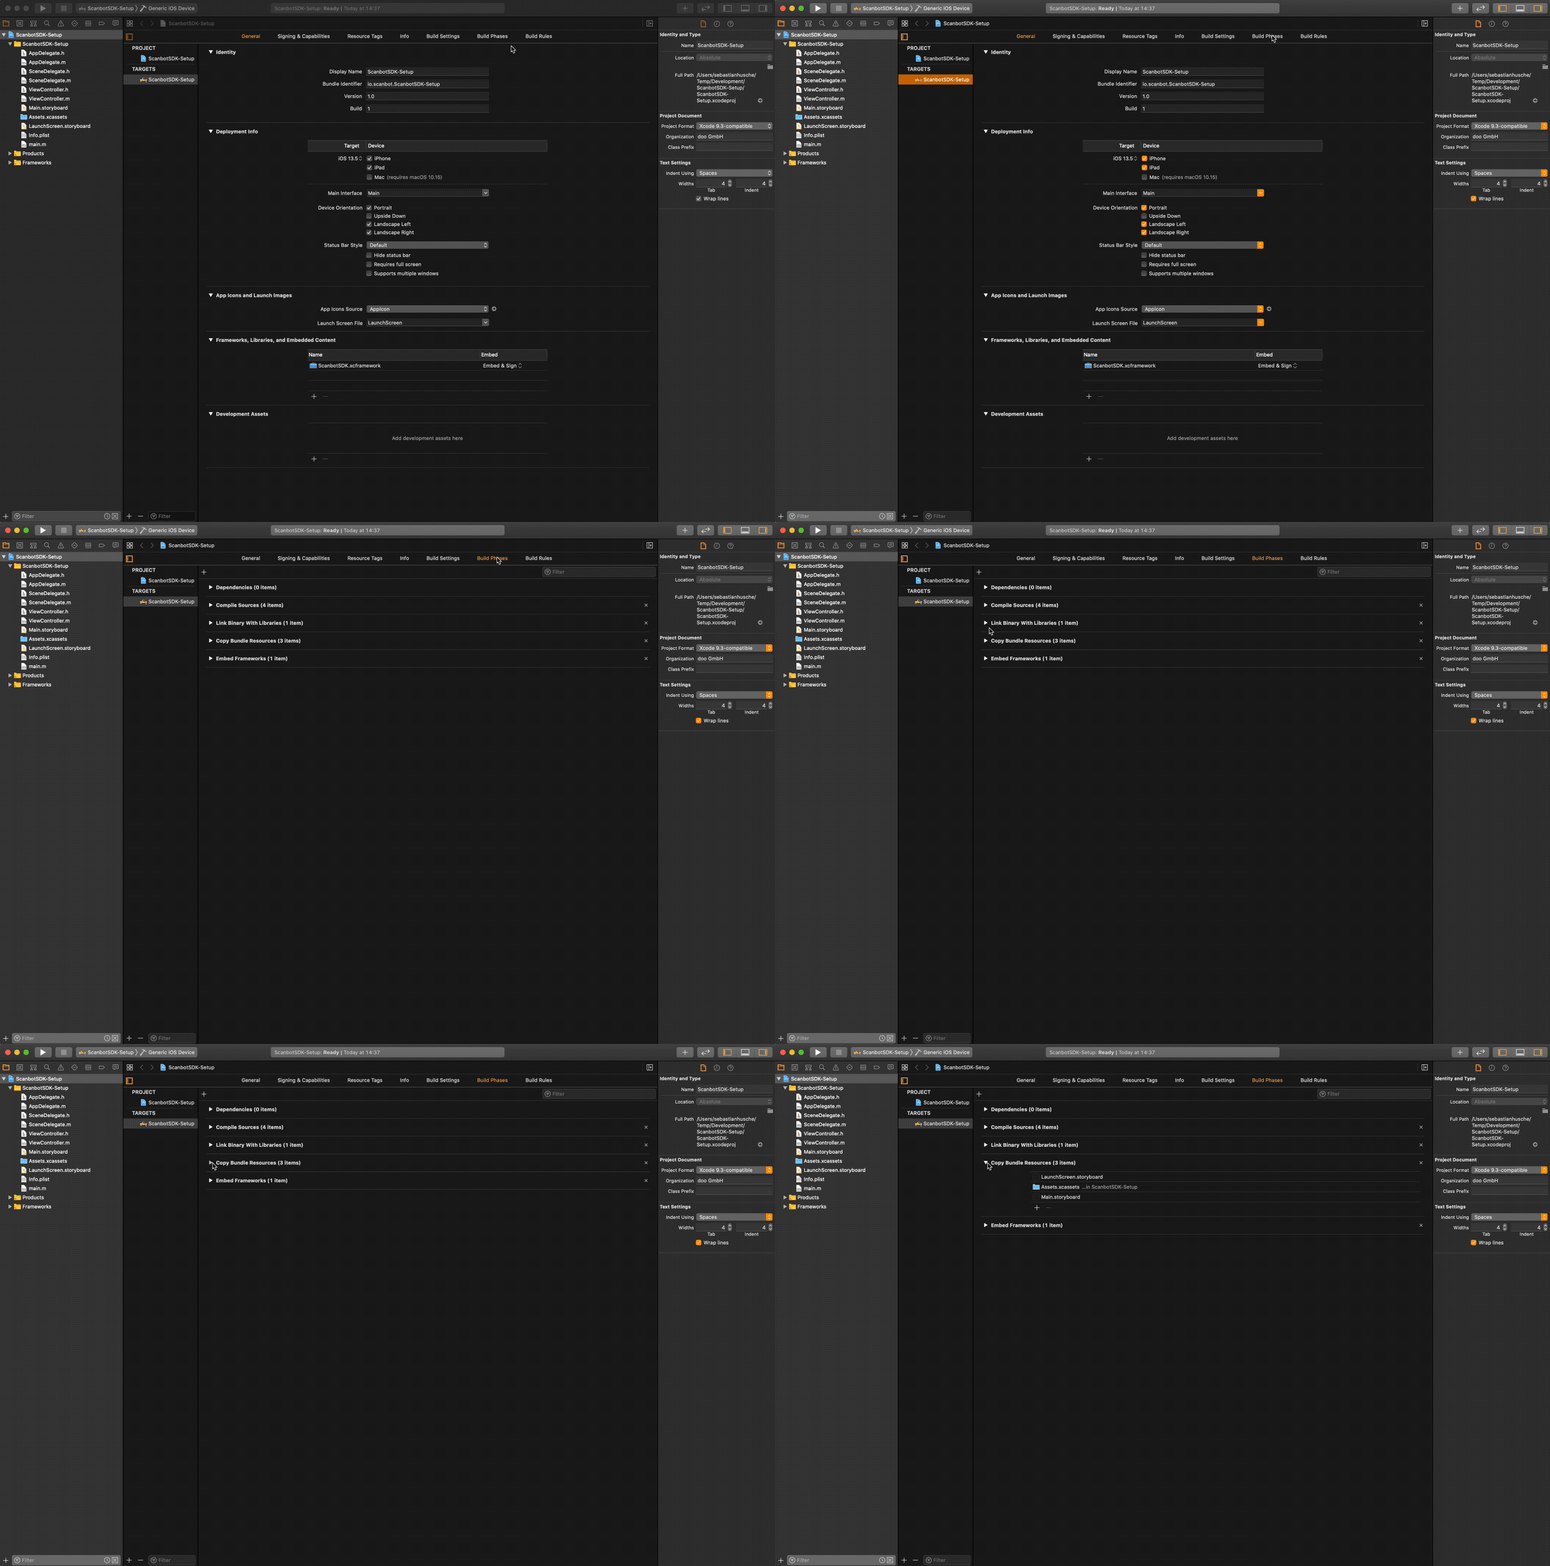 In your Xcode project navigate to Build Phases.
Step 2
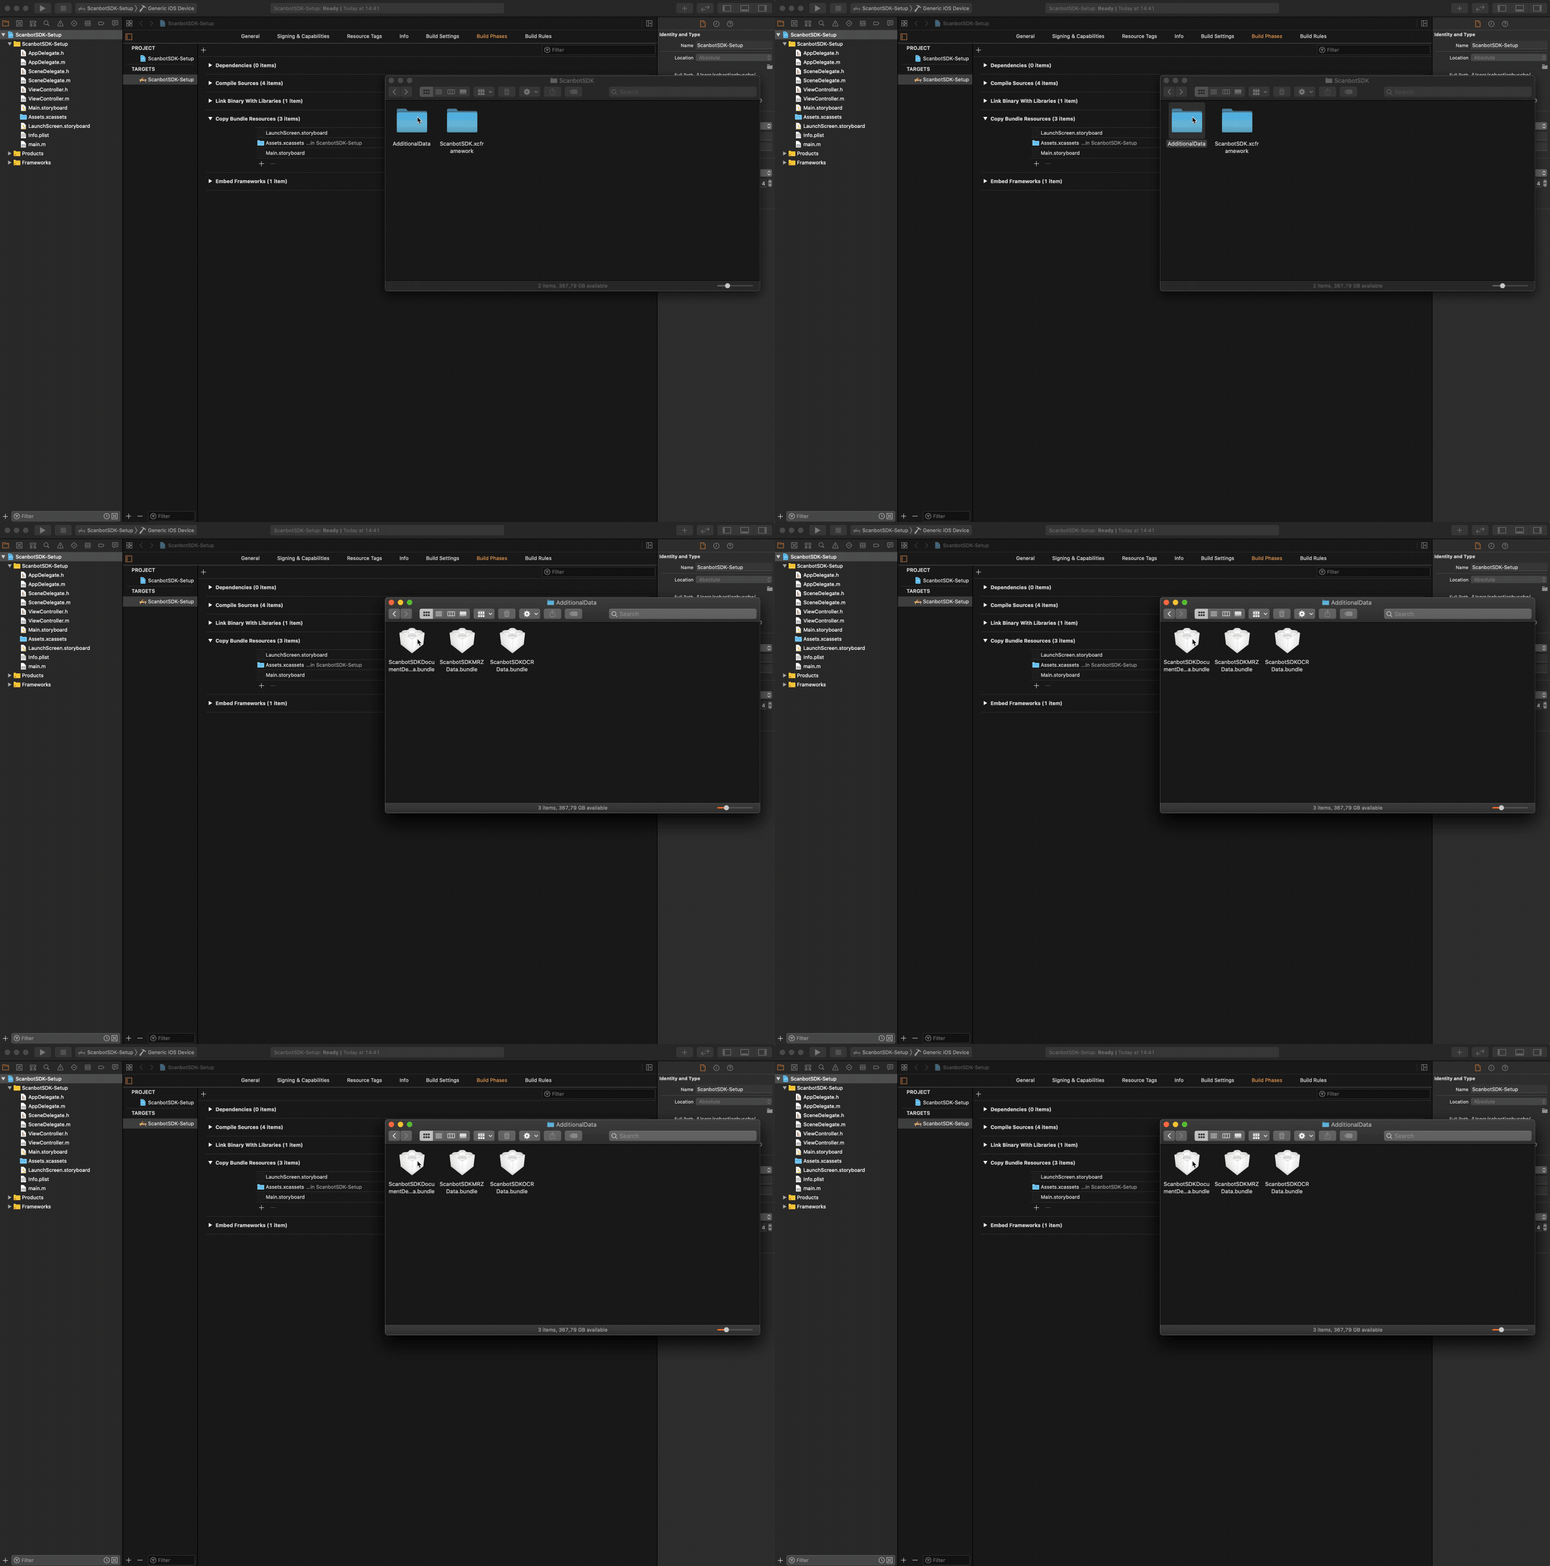 In Finder navigate to the AdditionalData folder.
Step 3
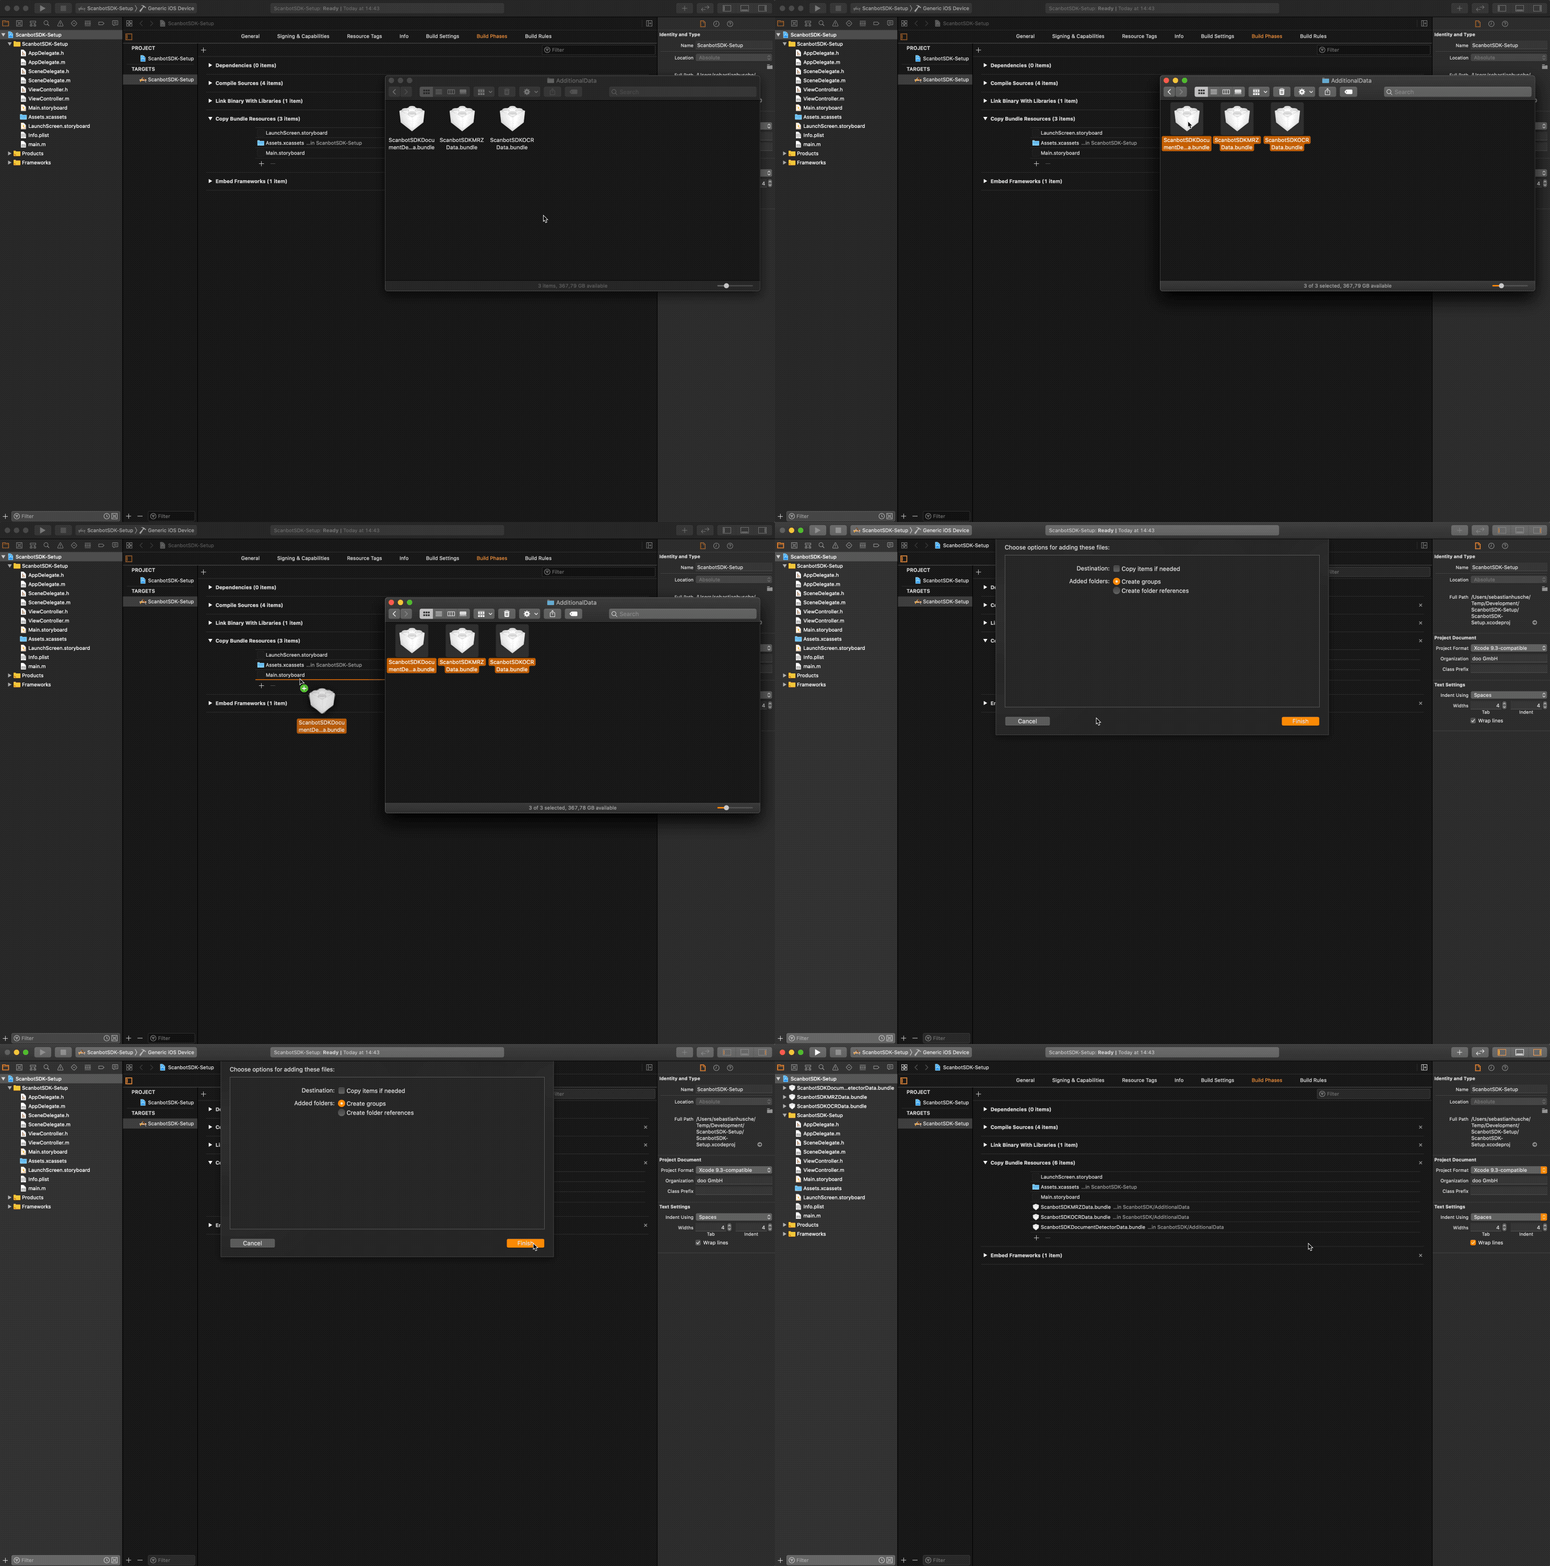 Drag the required data bundles to the 'Copy Bundle Resources' section.
Installation via Swift Package Manager
The Scanner SDK provides the ability to be integrated into your app via the Swift Package Manager (more about Swift Packages).
Installation guide
Step 1: Add the package
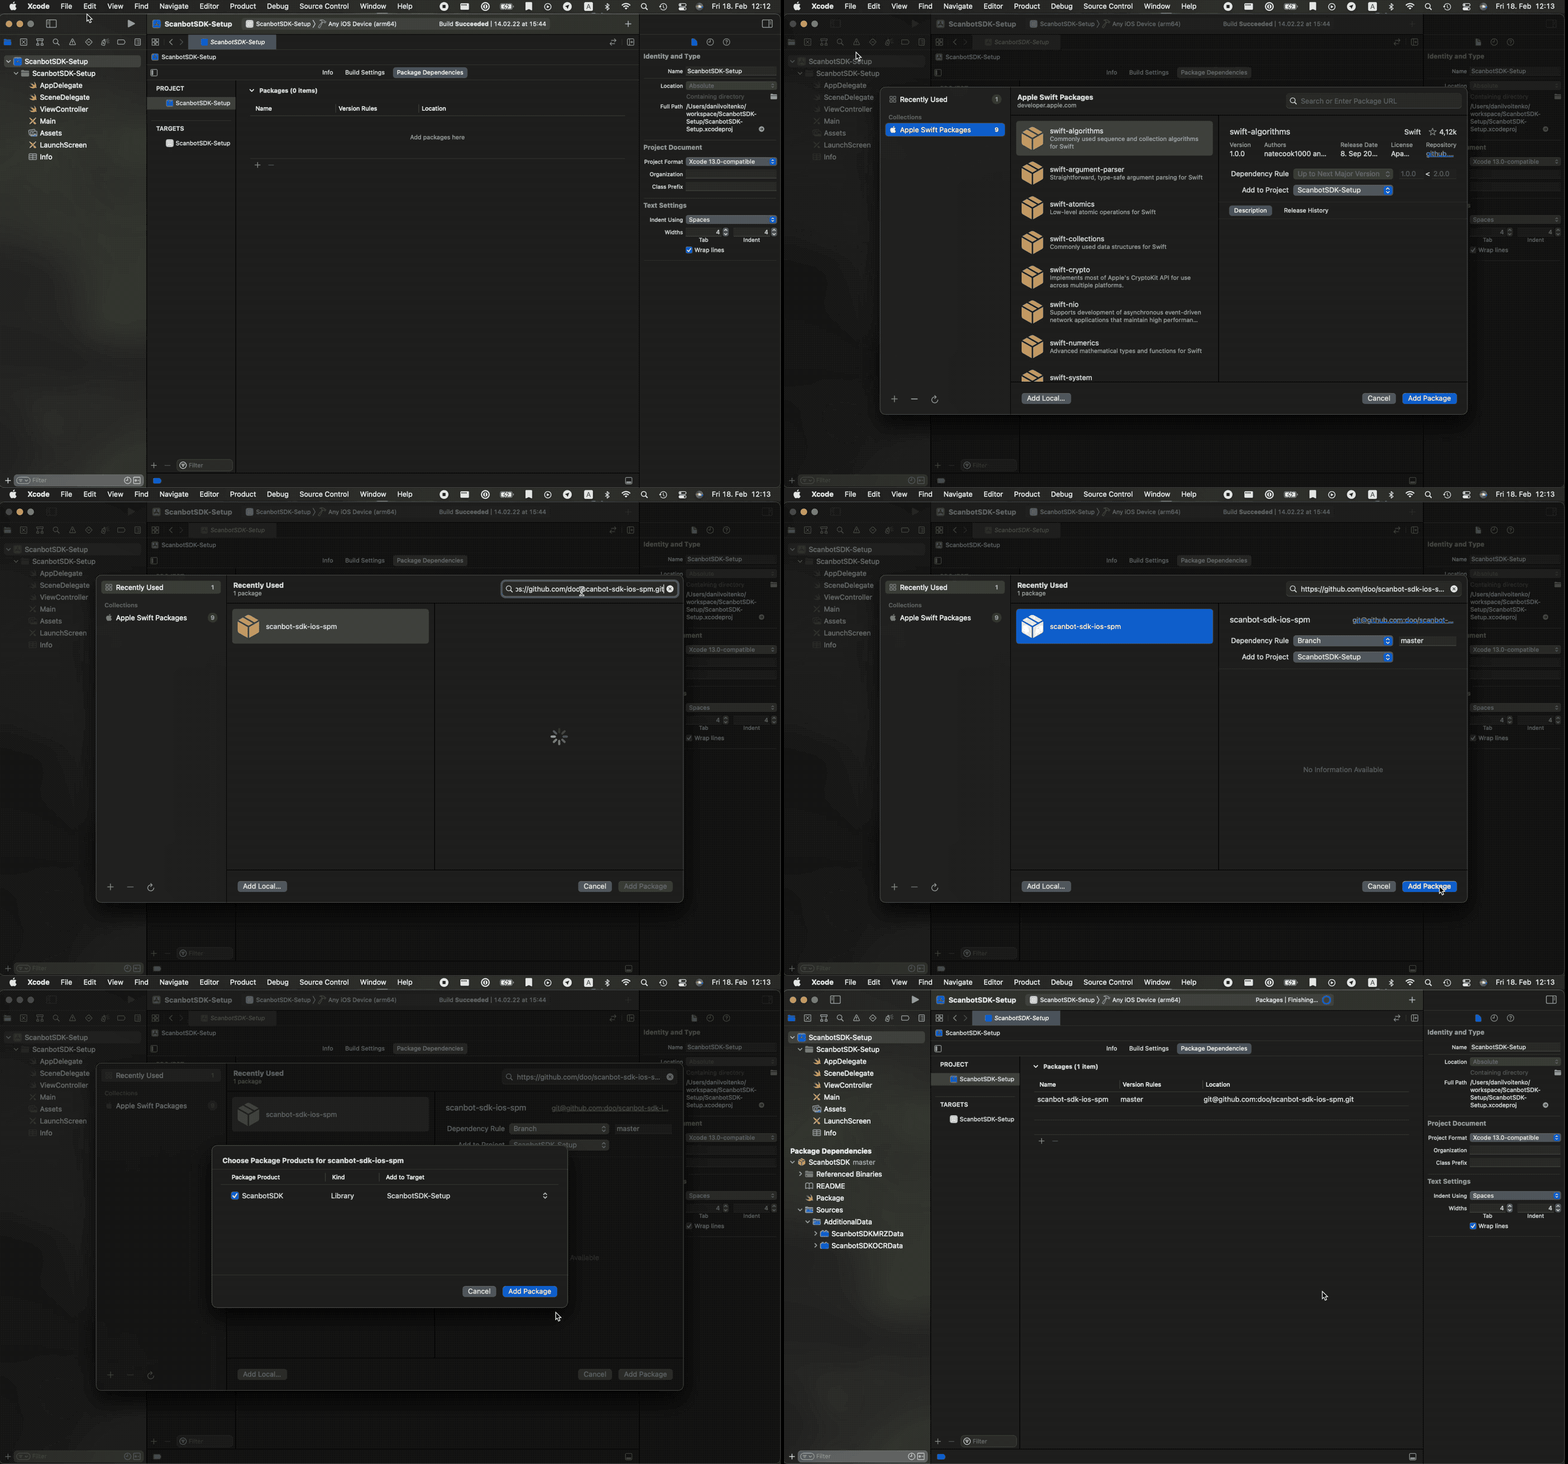
- In Xcode, go to File -> Add Packages...
- Paste the link to the package into the search bar.
- ScanbotSDK: https://github.com/doo/scanbot-sdk-ios-spm.git
- ScanbotDocumentScannerSDK: https://github.com/doo/scanbot-document-scanner-sdk-ios-spm.git
- Select the package.
- Click Add Package.
Install additional OCR data bundle if needed (Swift Package Manager, ScanbotSDK only)
Step 1: Add a new target for the copy script
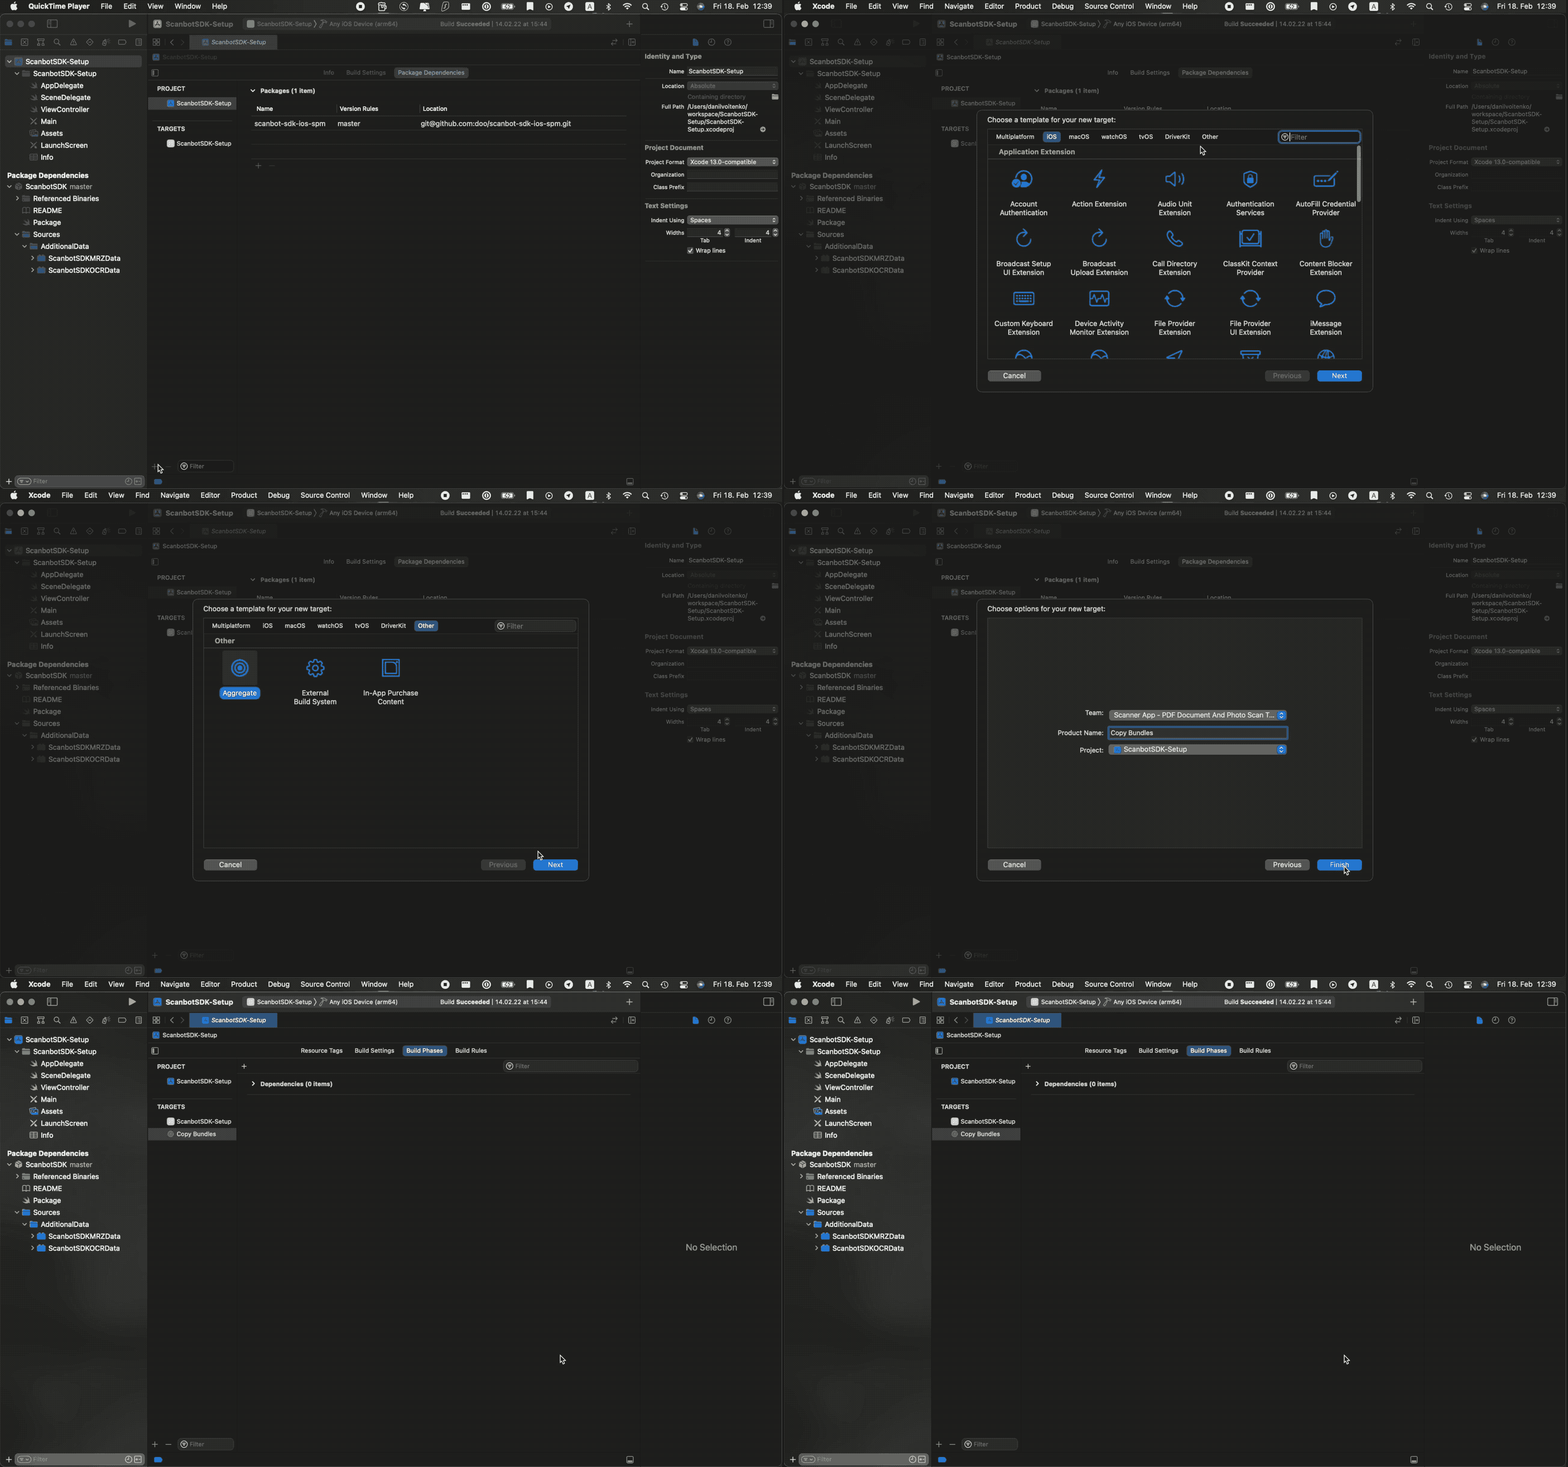
- Navigate to the project's settings and click the + button in the bottom left corner to add a new target.
- In the target's template menu, navigate to Other, select Aggregate and click Next.
- Name the new target, e.g. Copy Bundles, and click Finish.
Step 2: Add the copy script
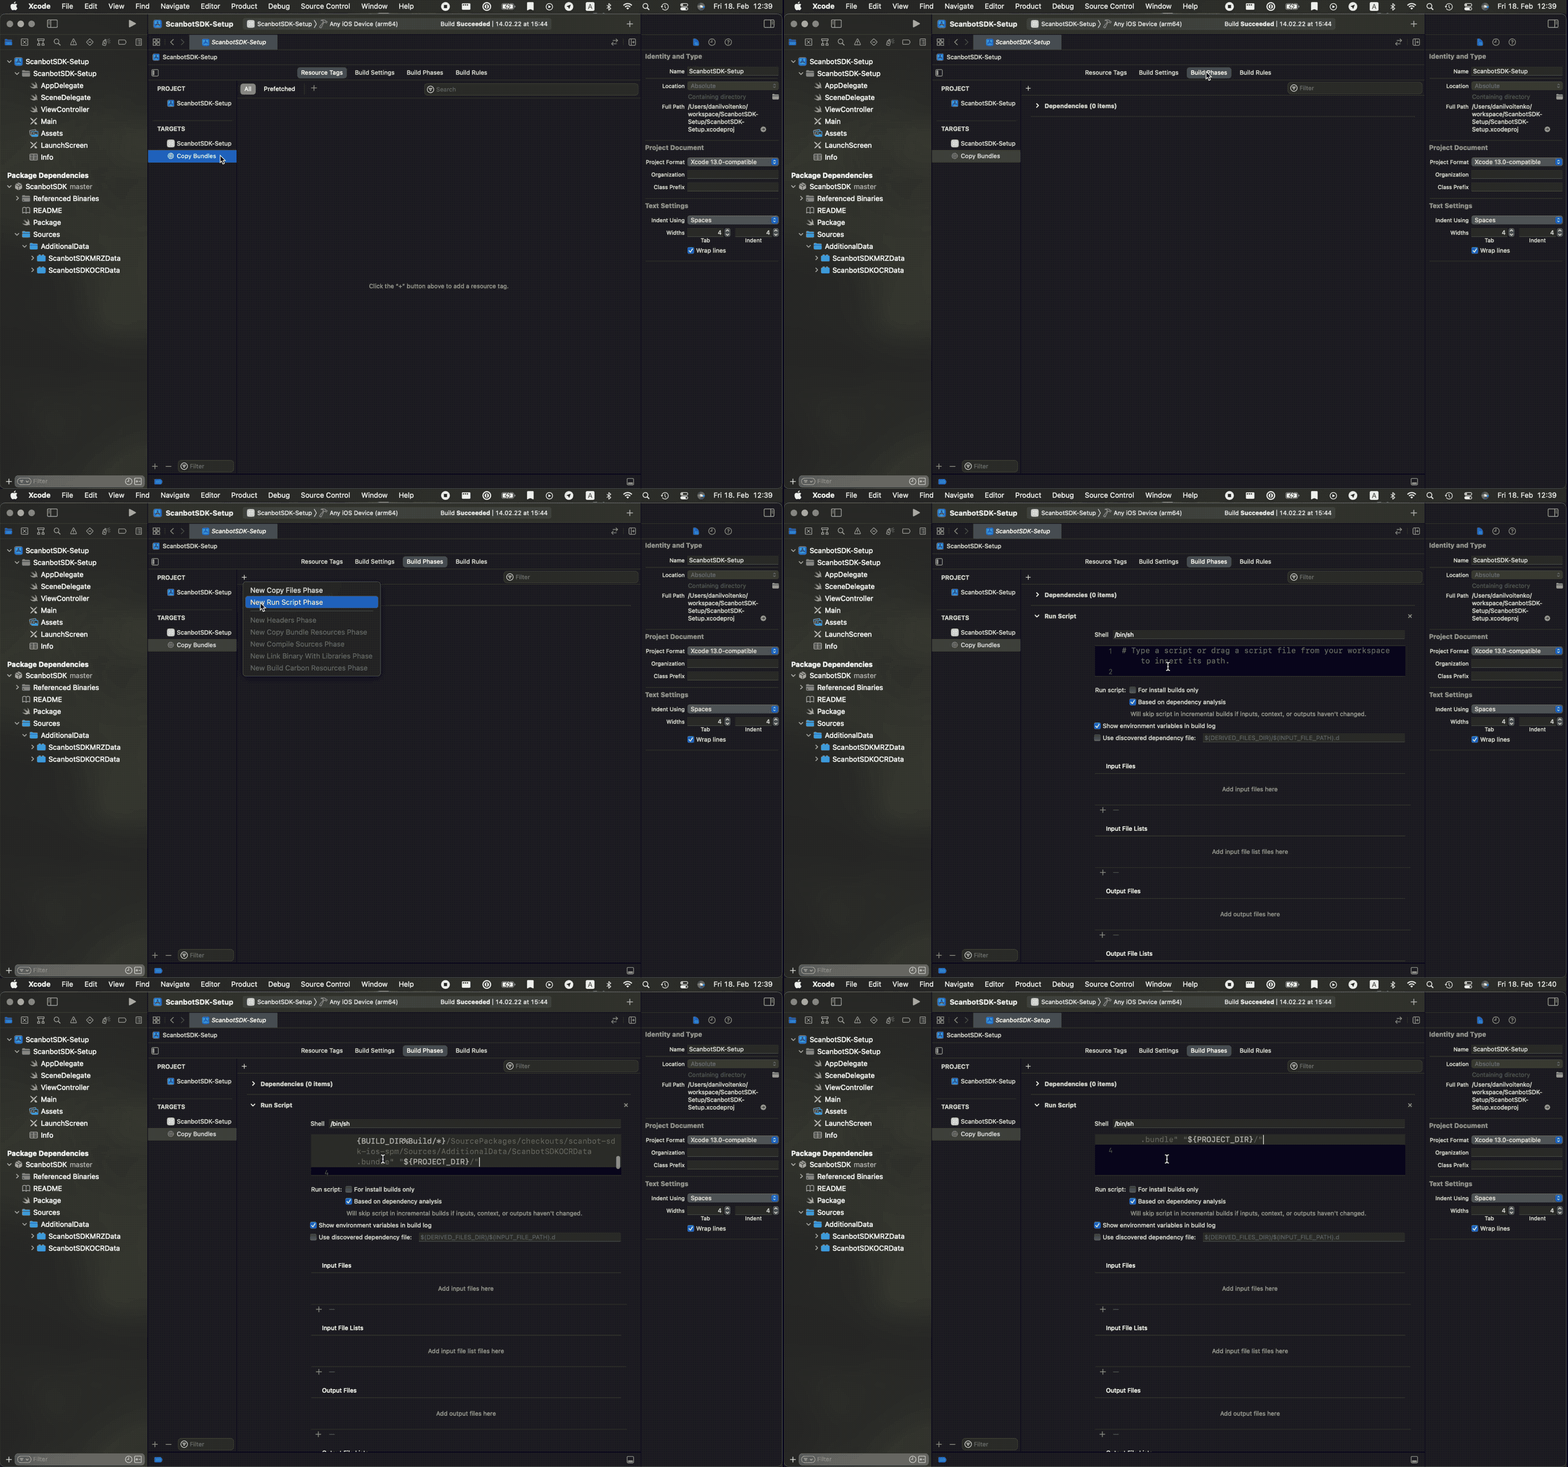
- Navigate to the newly created target's Build Phases, click the + button in the top left corner and select New Run Script Phase.
- Copy this script to the editor:
cp -af "${BUILD_DIR%Build/*}/SourcePackages/checkouts/scanbot-sdk-ios-spm/Sources/AdditionalData/ScanbotSDKOCRData.bundle" "${PROJECT_DIR}/"
- Navigate to the newly created target's Build Settings, find
ENABLE_USER_SCRIPT_SANDBOXINGand set it toNO. (Xcode 15 and later)
This script automatically copies additional bundles from the temporary package directory to your project's main directory.
Step 3: Add a dependency
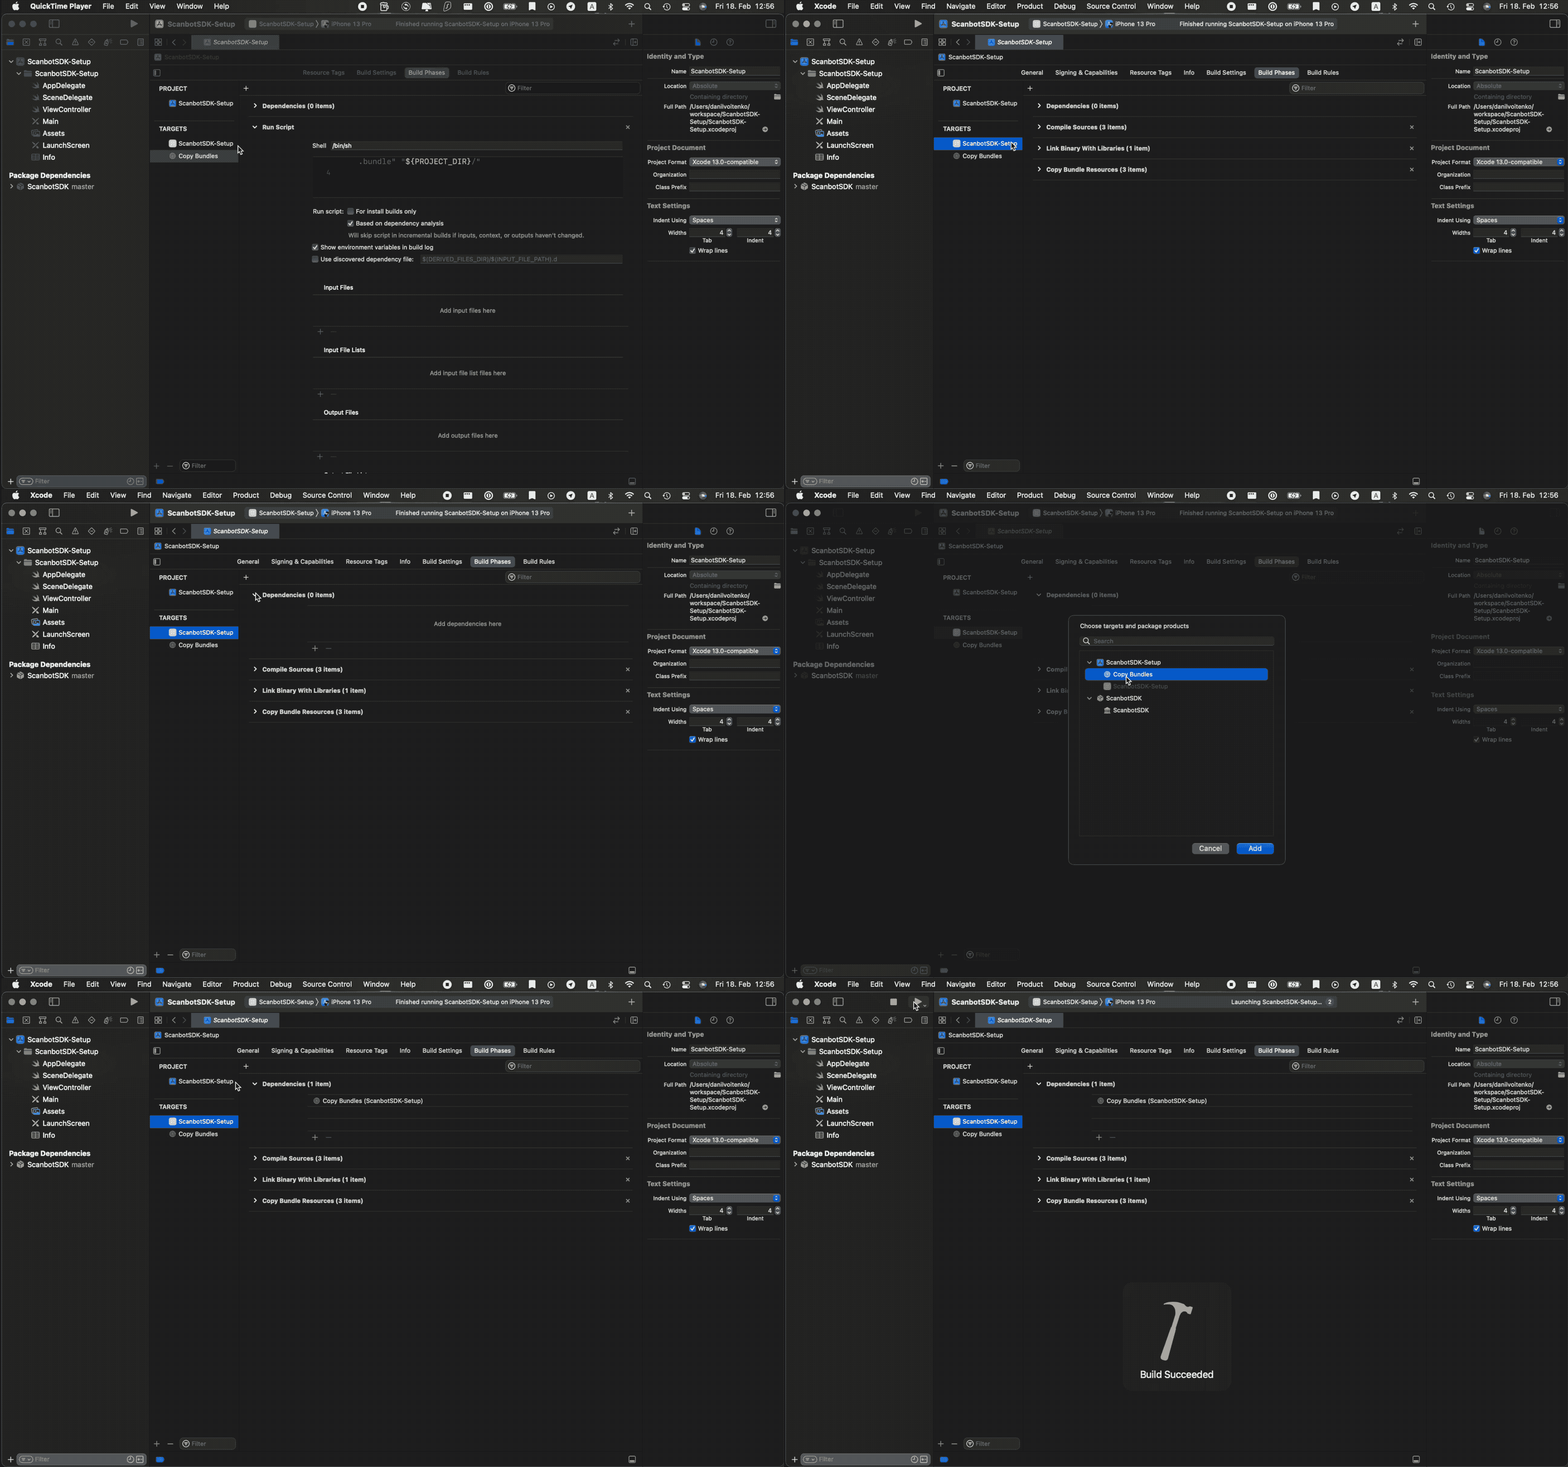
- Navigate to ScanbotSDK-Setup -> Build Phases and add the newly created target as a dependency.
- Run the project.
Step 4: Add bundles to a Project
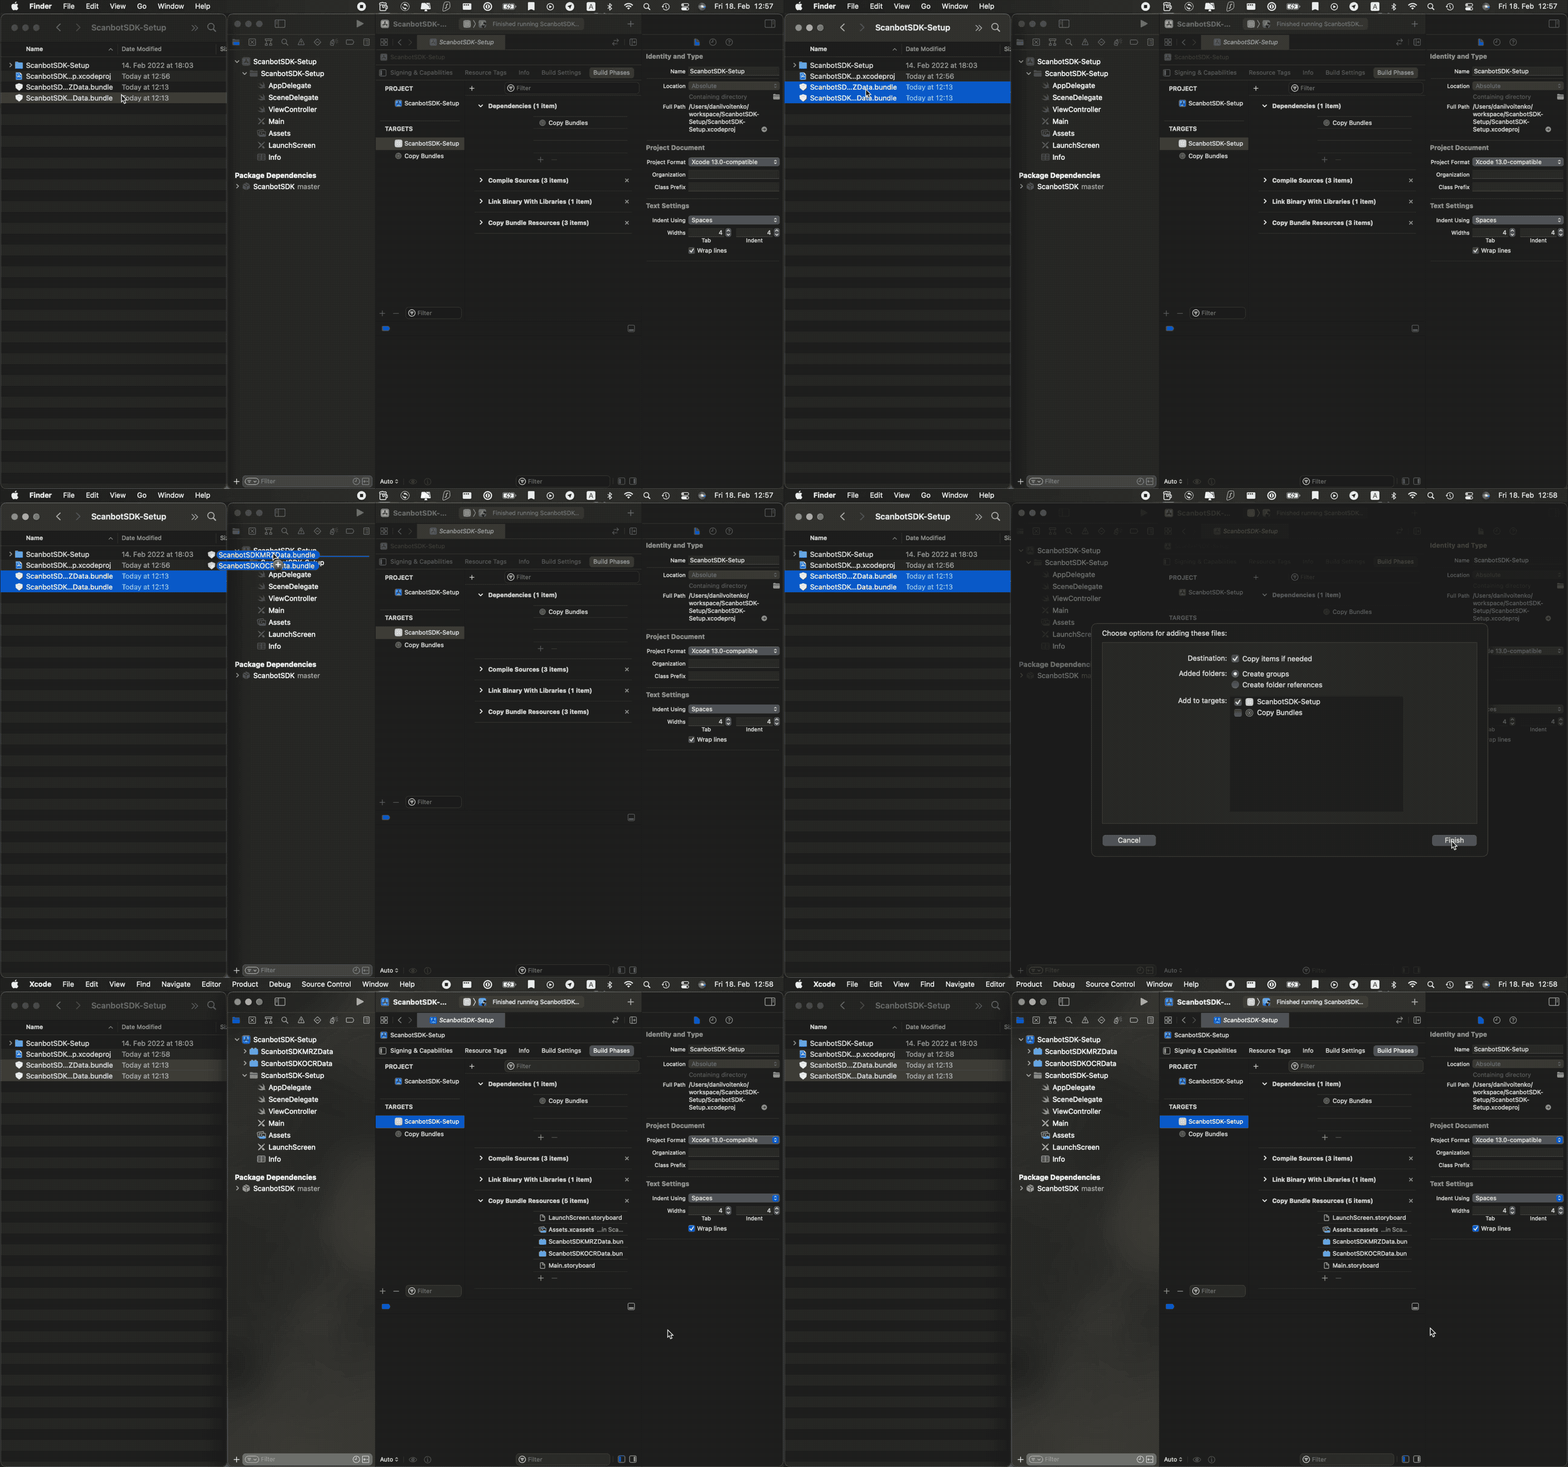 In the Finder, navigate to the project's folder and drag
 ScanbotSDKOCRData.bundle into Xcode, confirm ScanbotSDK-Setup target is checked and click Finish.
What do you think of this documentation?
What can we do to improve it? Please be as detailed as you like.